Wireless network (wi-fi)
Concordia University provides secure wireless internet (wi-fi) for active students, faculty and staff across campus.
Before connecting for the first time, most devices must be configured. Follow the step-by-step instructions in the Documentation section below for your device and operating system. Please sign in using your Concordia email address and password. Make sure you have activated your netname account before you begin.
Visitors who cannot connect through the eduroam wireless network may be eligible for a sponsored guest wi-fi account. Guest access must be requested by a Concordia department or faculty/staff member.
Who can use it?
Students who are registered for classes in the current term, and faculty and staff.
How much does it cost?
There is no cost for active faculty, staff and students.
How to get it
Connect to Concordia wi-fi:
- First-time setup: Select your device and operating system in the Documentation section below and follow the setup instructions.
- Sign in: Use your Concordia email address and password to connect.
Guest wi-fi access
- Request a guest wi-fi access code by completing the Equipment Loan and Rental Request Form.
- For requests supporting more than 15 participants or hospitality events, charges may apply. Rates are available on the Equipment Loan and Rental page.
- Hospitality event requests must be submitted through your event coordinator at least three business days before the event.
Service availability
24/7
Documentation
How to connect to the ‘ConcordiaUniversity’ wireless network
Select your operating system/device below:
Option 1: Manual configuration
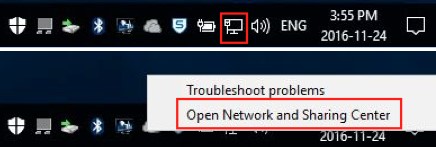
1. Right click on the Network icon and choose 'Open Network and Sharing Center'.
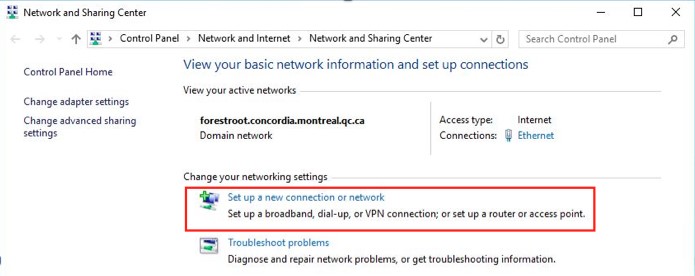
2. Select ‘Set up a new connection or network.’
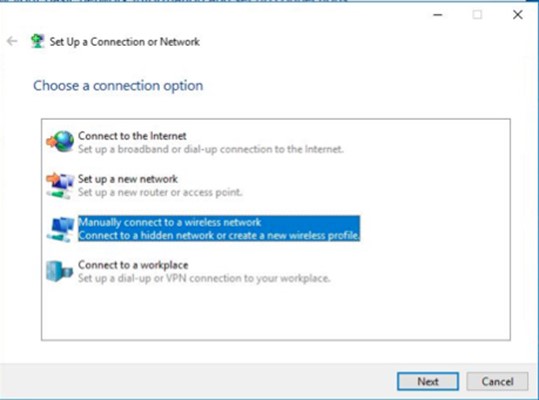
3. A new window will open, allowing you to choose a connection option. Select ‘Manually connect to a wireless network’ and click ‘Next.’
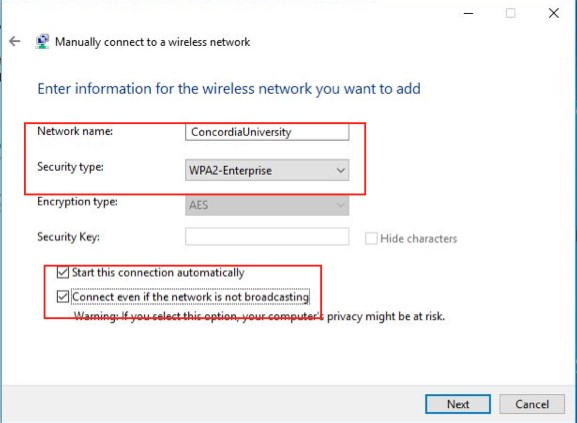
4. Enter the information as shown in the image below and then click ‘Next.’
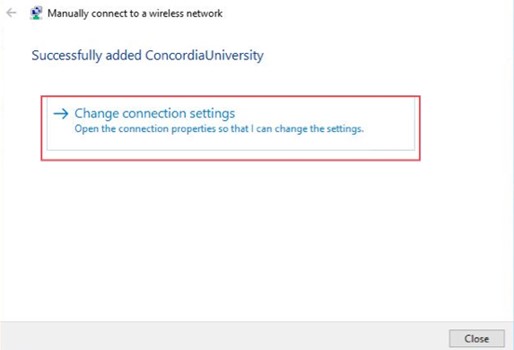
5. Another window should open stating that you have successfully added ConcordiaUniversity. Select ‘Change connection settings
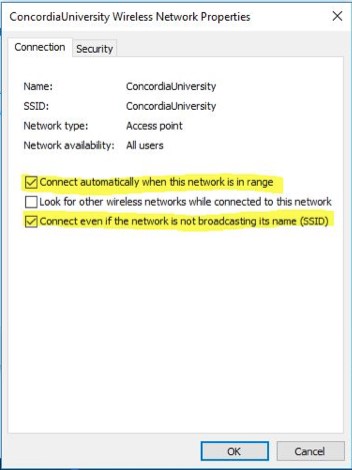
6. The Wireless Network Properties window will appear. Select the ‘Connection’ tab and check the first and third boxes (Connect automatically when this network is in range & Connect even if the network is not broadcasting its name (SSID)).
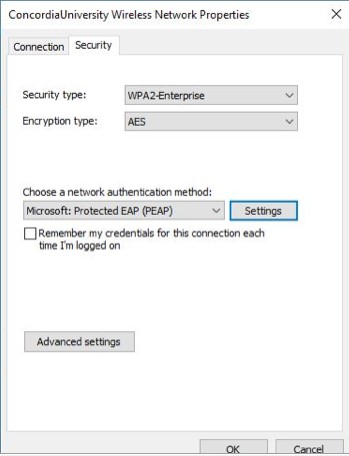
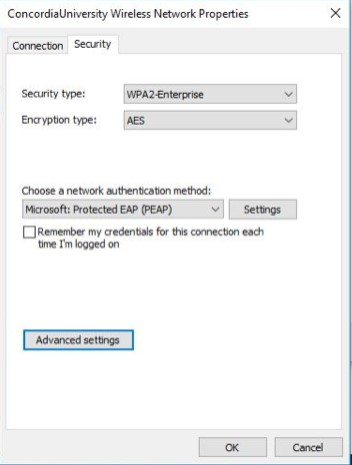
7. Select the ‘Security’ tab. The network authentication method should be Microsoft Protected EAP (PEAP). You may also choose to remember the credentials by checking the applicable box, then click ‘Settings.’
8. A pop-up window will open. Please make sure the following boxes should be checked and information should be filled out:
Check box of ‘Verify the server's identity by validating the certificate’
Check box of ‘Connect to these servers …’, and input “wireless.concordia.ca”
Check box of ‘GlobalSign Root CA’
Select ‘Tell user if the server’s identity can’t be verified’ in the list of Notification before connecting
Check the box of ‘Enable Fast Reconnect’
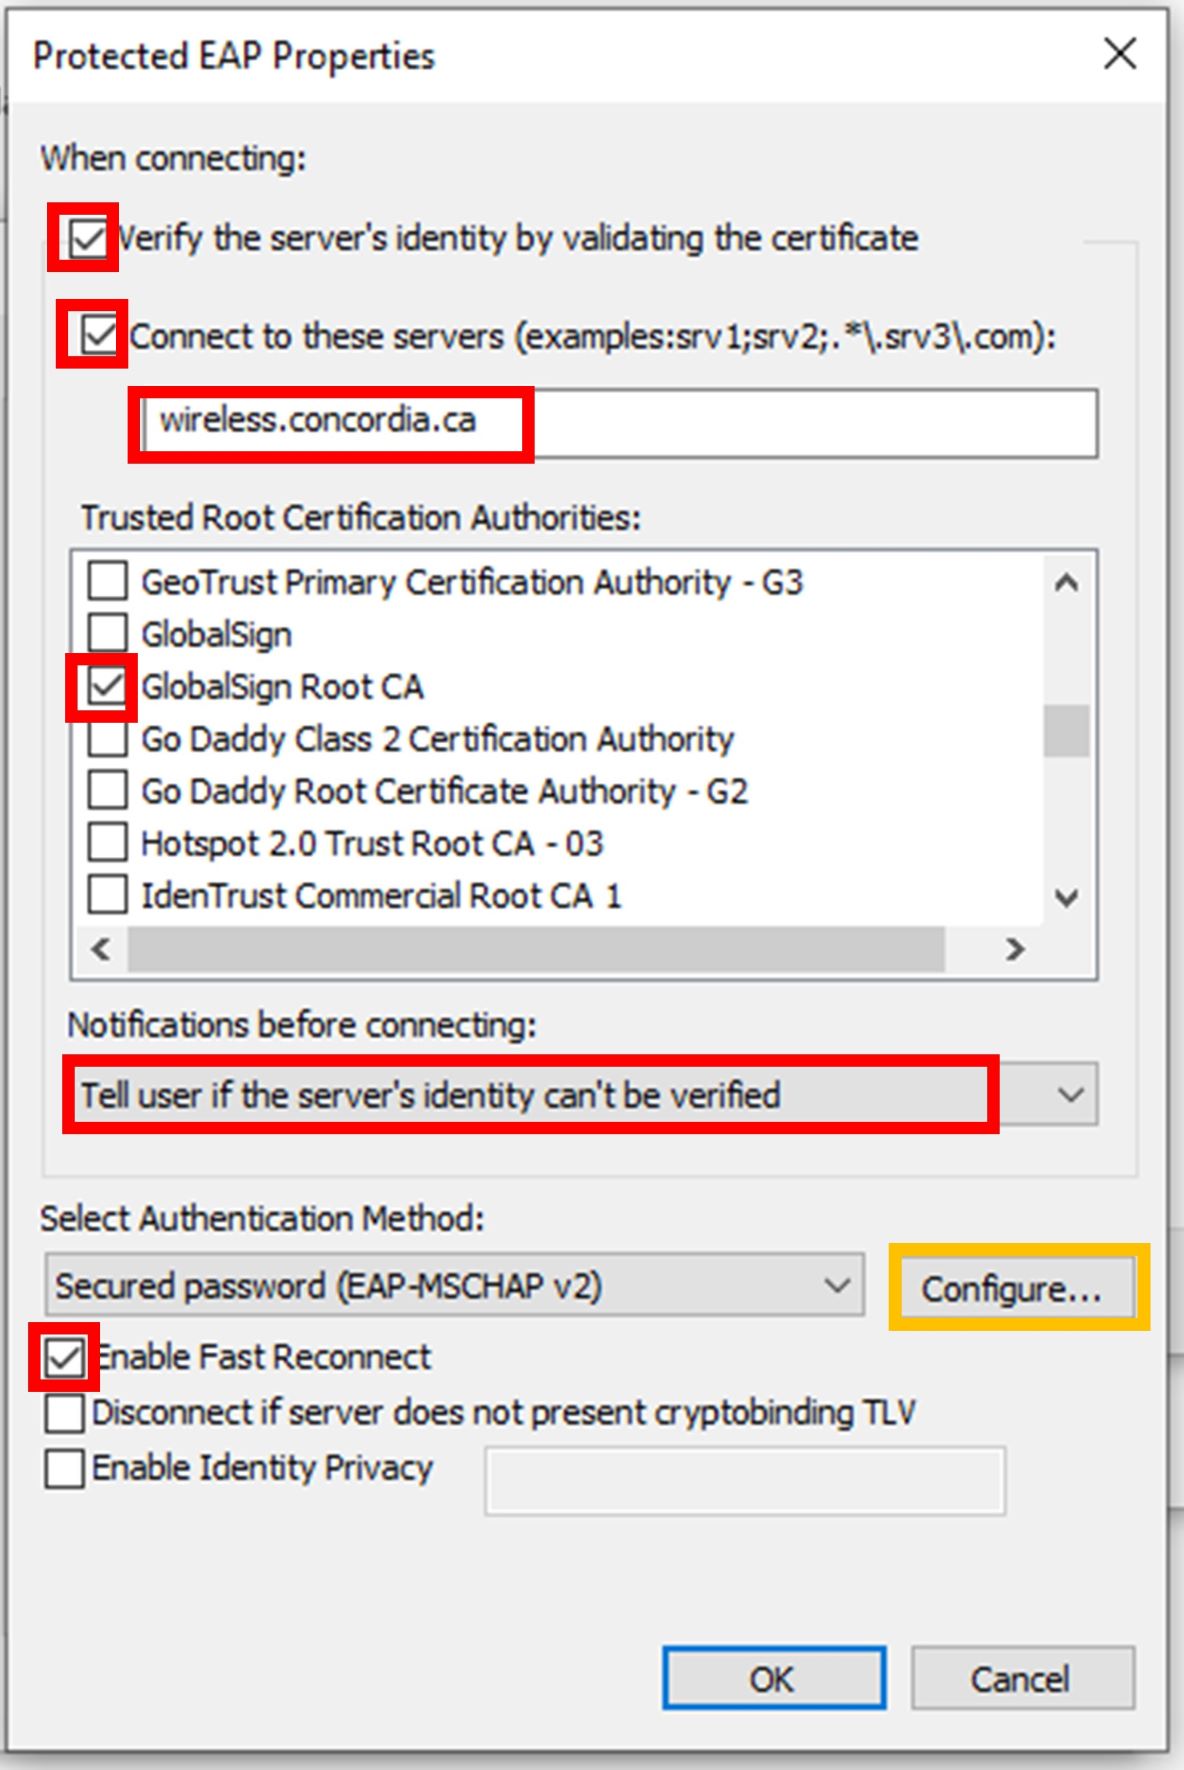
Then click ‘Configure...’
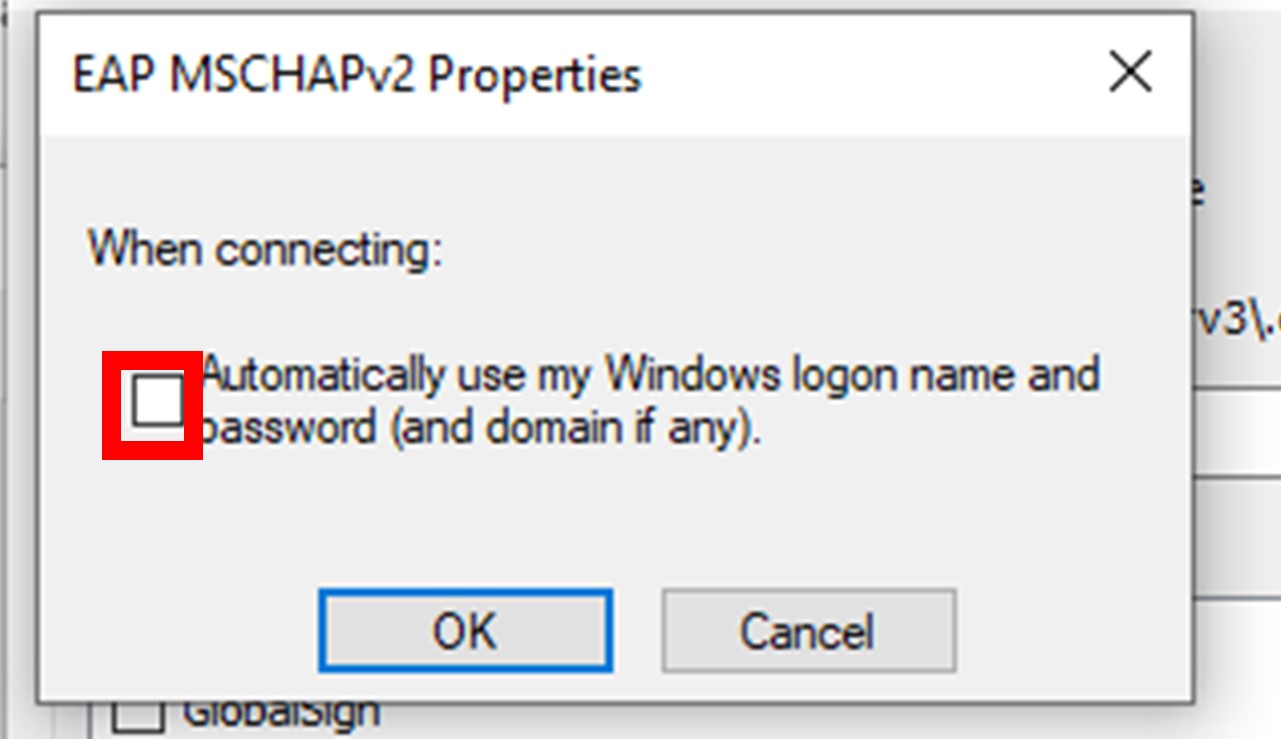
9. A pop-up window named ‘EAP MSCHAPv2 Properties’ will appear.
By default, this option will be selected — unselect it and click OK.
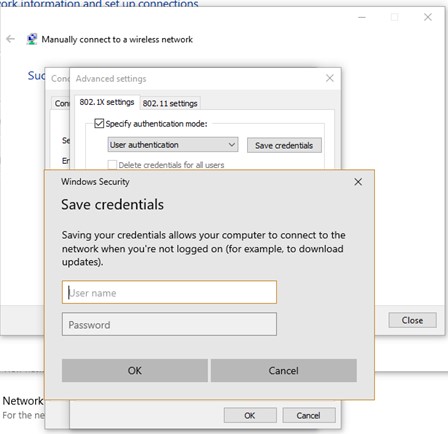
10. This will bring you back to the Wireless Network Properties window. Select the ‘Advanced settings’ button.
11. In the Advanced settings window, select ‘Specify authentication mode’ and select ‘User authentication.’ Save your credentials and click OK.
Please use your Concordia e-mail address and Concordia e-mail address password to login.
For new students and employees, if you did not receive your e-mail address, please use your Concordia netname and password (You can manually modify it after getting your e-mail address
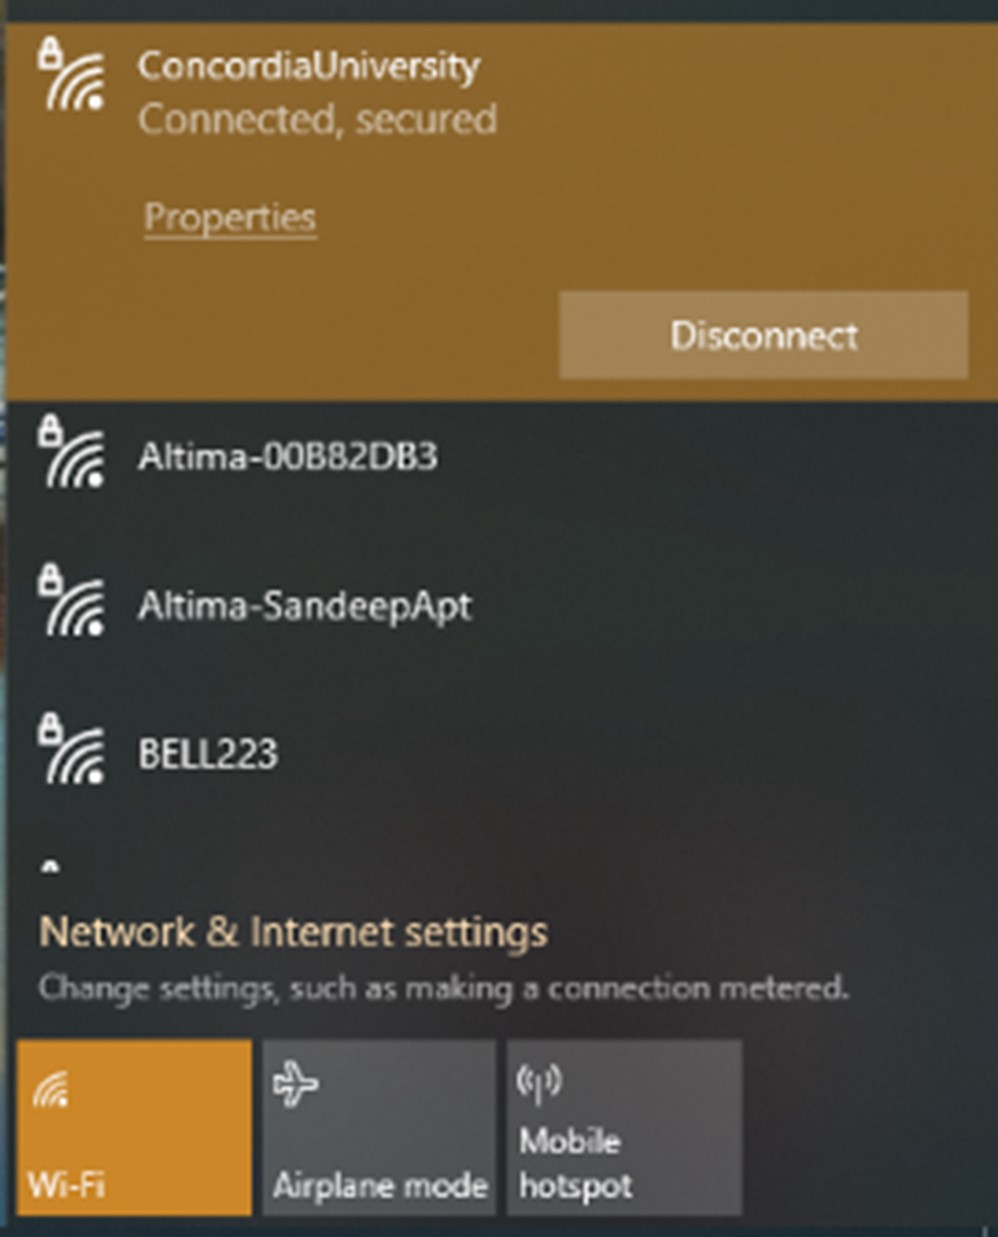
12. Few seconds after you closing all of the configuration windows, you should connect to the “ConcordaiUniversity” wireless network.
Option 1: Manual configuration
1. Right click on the Network icon and choose 'Open Network and Sharing Center'.
2. Select ‘Set up a new connection or network.’
3. A new window will open, allowing you to choose a connection option. Select ‘Manually connect to a wireless network’ and click ‘Next.’
4. Enter the information as shown in the image below and then click ‘Next.’
5. Another window should open stating that you have successfully added ConcordiaUniversity. Select ‘Change connection settings
6. The Wireless Network Properties window will appear. Select the ‘Connection’ tab and check the first and third boxes (Connect automatically when this network is in range & Connect even if the network is not broadcasting its name (SSID)).
7. Select the ‘Security’ tab. The network authentication method should be Microsoft Protected EAP (PEAP). You may also choose to remember the credentials by checking the applicable box, then click ‘Settings.’
8. A pop-up window will open. Please make sure the following boxes should be checked and information should be filled out:
Check box of ‘Verify the server's identity by validating the certificate’
Check box of ‘Connect to these servers …’, and input “wireless.concordia.ca”
Check box of ‘GlobalSign Root CA’
Select ‘Tell user if the server’s identity can’t be verified’ in the list of Notification before connecting
Check the box of ‘Enable Fast Reconnect’
Then click ‘Configure...’
9. A pop-up window named ‘EAP MSCHAPv2 Properties’ will appear.
By default, this option will be selected — unselect it and click OK.
10. This will bring you back to the Wireless Network Properties window. Select the ‘Advanced settings’ button.
11. In the Advanced settings window, select ‘Specify authentication mode’ and select ‘User authentication.’ Save your credentials and click OK.

Please use your Concordia e-mail address and Concordia e-mail address to login.
For new students and employees, if you did not receive your e-mail address, please use your Concordia netname and password (You can manually modify it after getting your e-mail address).
12. Few seconds after you closing all of the configuration windows, you should connect to the “ConcordaiUniversity” wireless network.
Option 2: Fast configuration (If you encounter connectivity issues with this configuration, please refer to the manual configuration in the FAQ section)
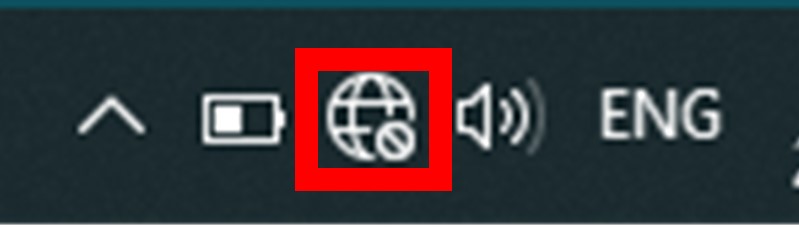
1. Click on the Network icon in the System tray
2. Select “ConcordiaUniversity” SSID, then click on Connect

3. Enter your Concordia University e-mail address (in the username field) and password, then click OK.
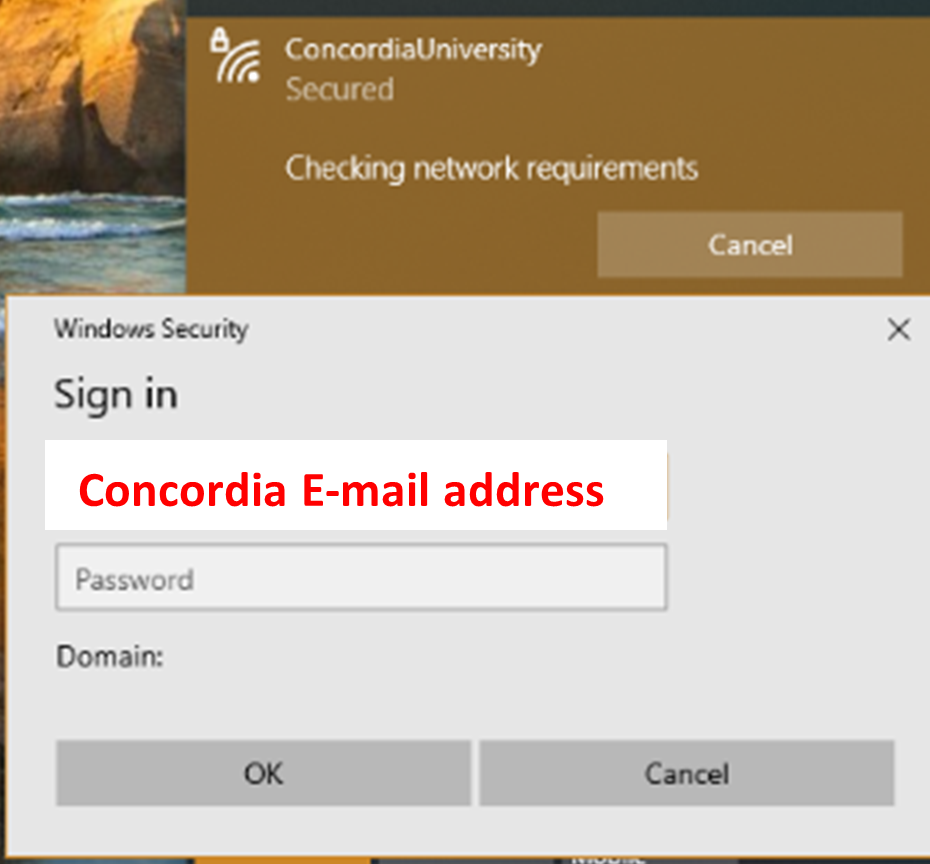
Please note: For new students and employees, if you did not receive your e-mail address, please use your Concordia netname and password (You can manually modify it after getting your e-mail address).
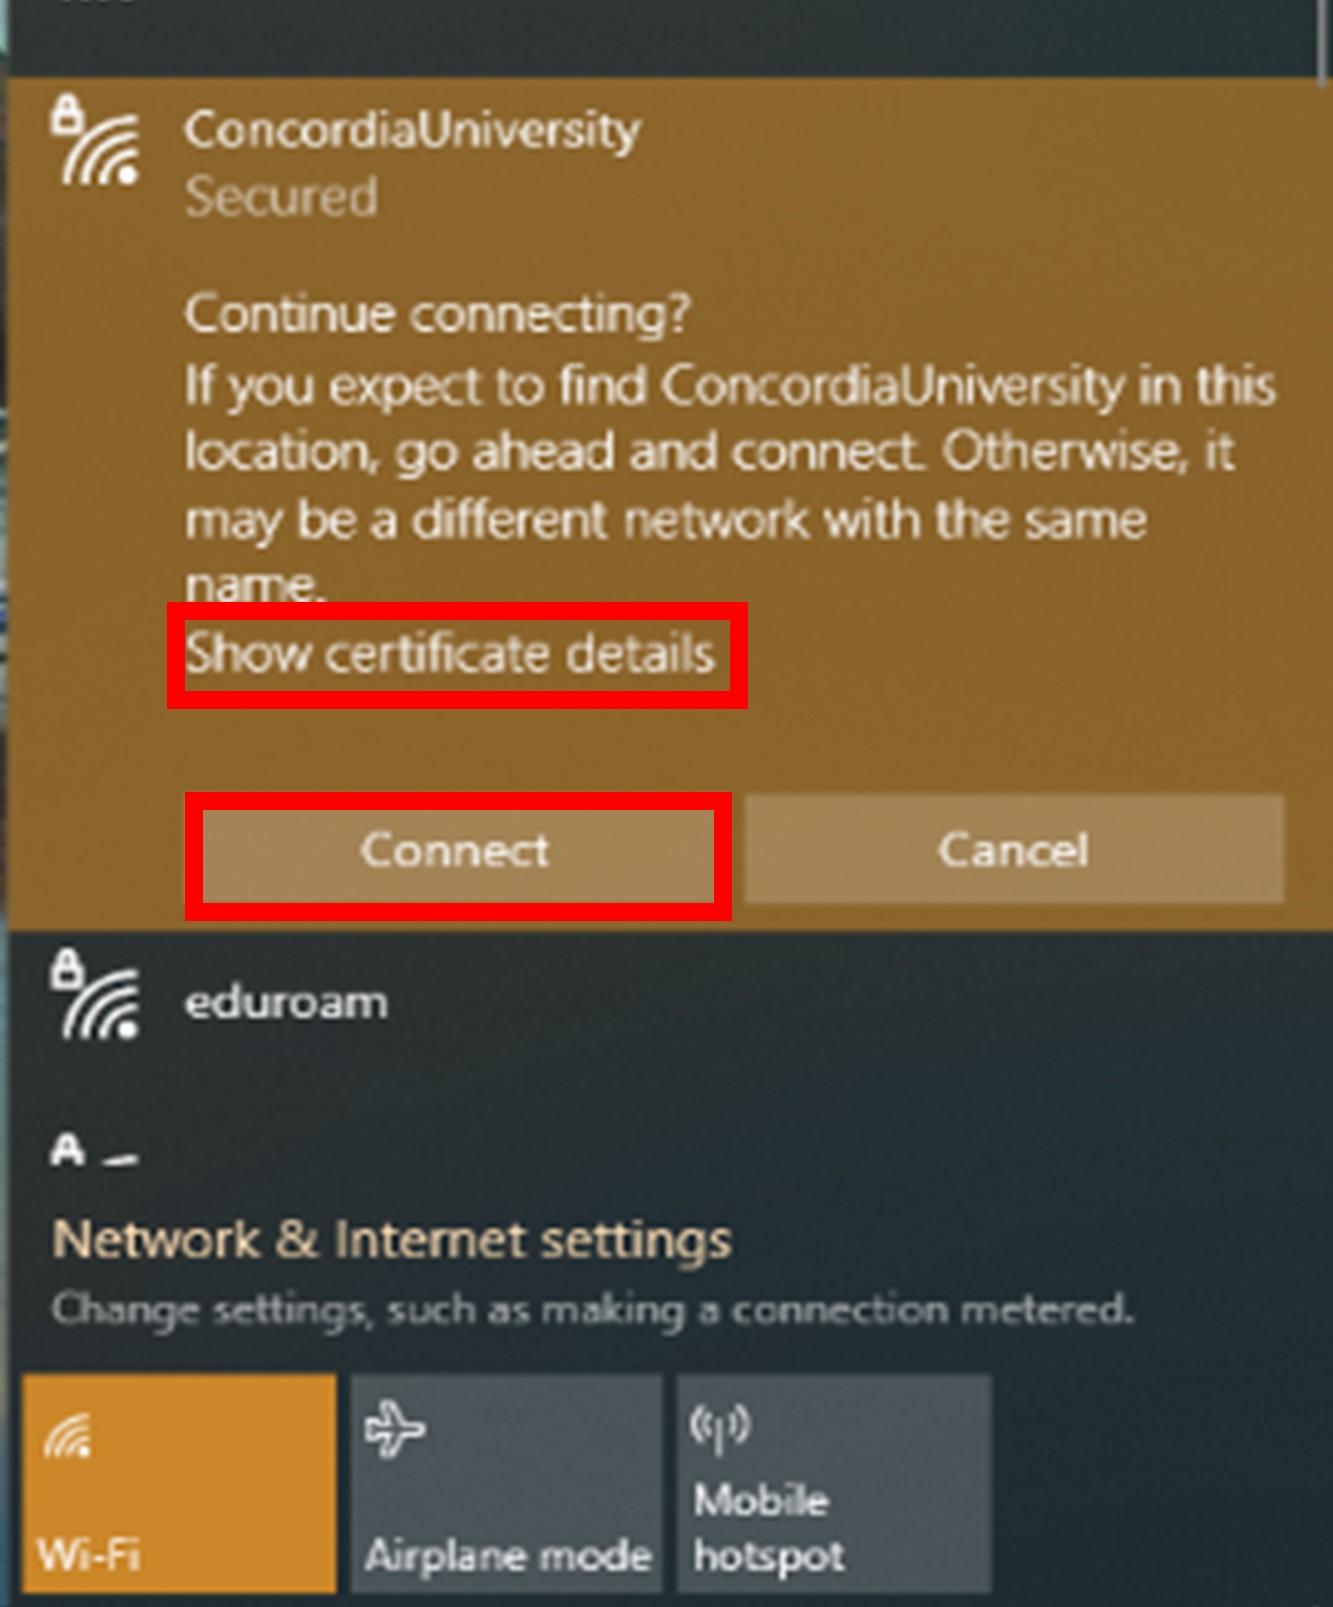
4. Click Connect to continue with authentication.
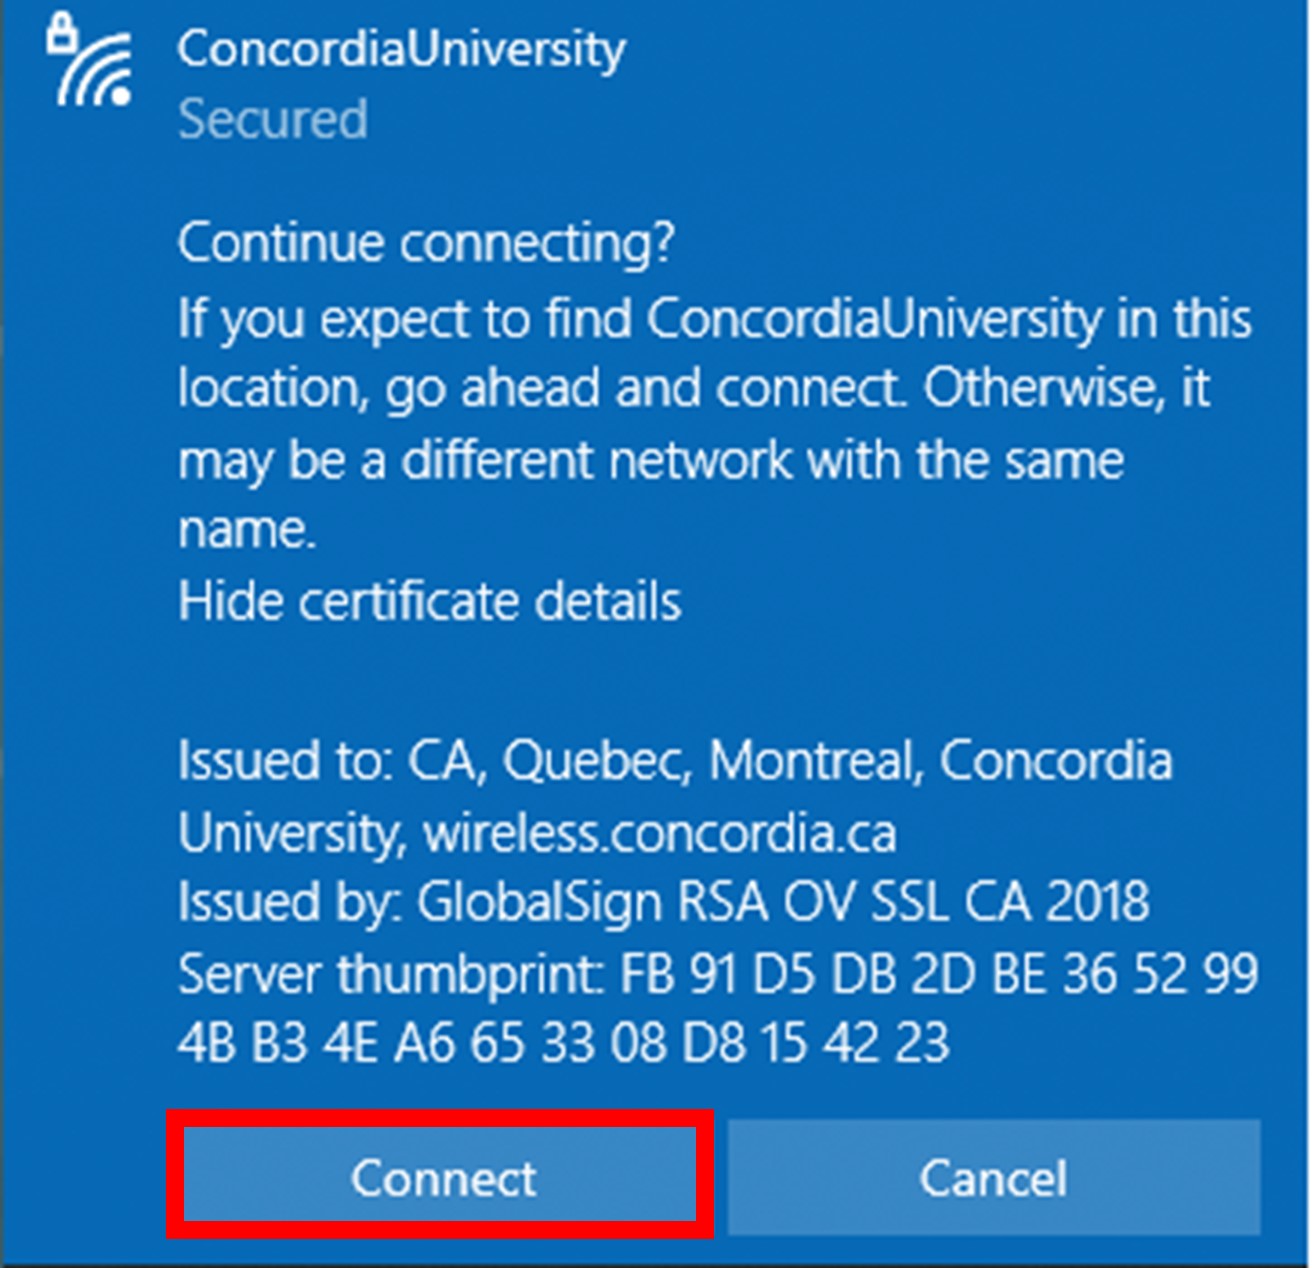
Note: You will see a Windows Security Alert message saying "Continue connecting? If you expect to find ...." Please click Connect. If you click “Show certificate details”, the certificate should be issued to CA, QC, Montreal, Concordia University, IITS, wireless.concordia.ca and issued by ‘GlobalSign …’.
5. You should now be successfully connected to ConcordiaUniversity wireless network.
Before you begin, ensure that you have an AirPort card or a Wireless Network card that is supported by your Macintosh. Please see Apple Airport Support for more information on supported devices. Make sure that the AirPort software is up to date by running a software update in the system preferences under the apple menu.
This describes the procedure used for connecting systems using Apple's OS X 10.7 or higher to the Concordia University Wireless network using PEAP and WPA2 protocols. The instructions here may not work on earlier versions of OS X and may vary depending on your configuration. For further information on OS X wireless support, lease visit the Apple website.
Steps to follow:
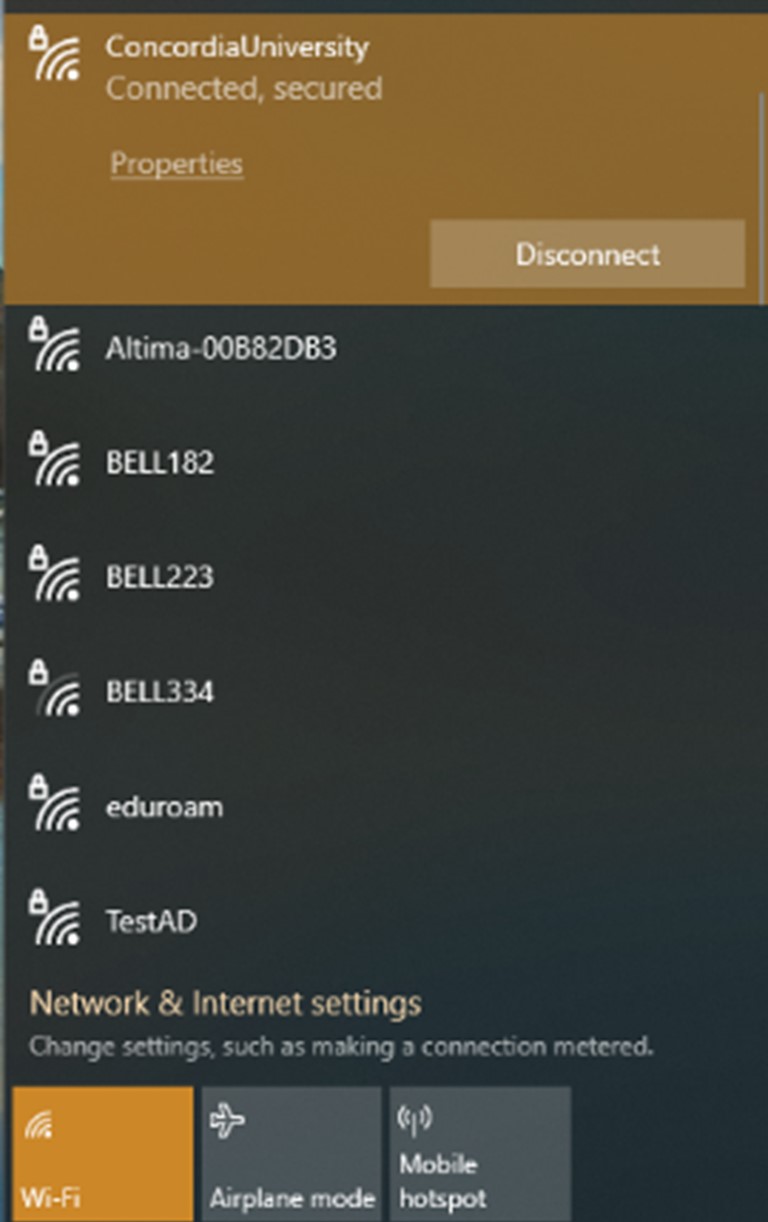
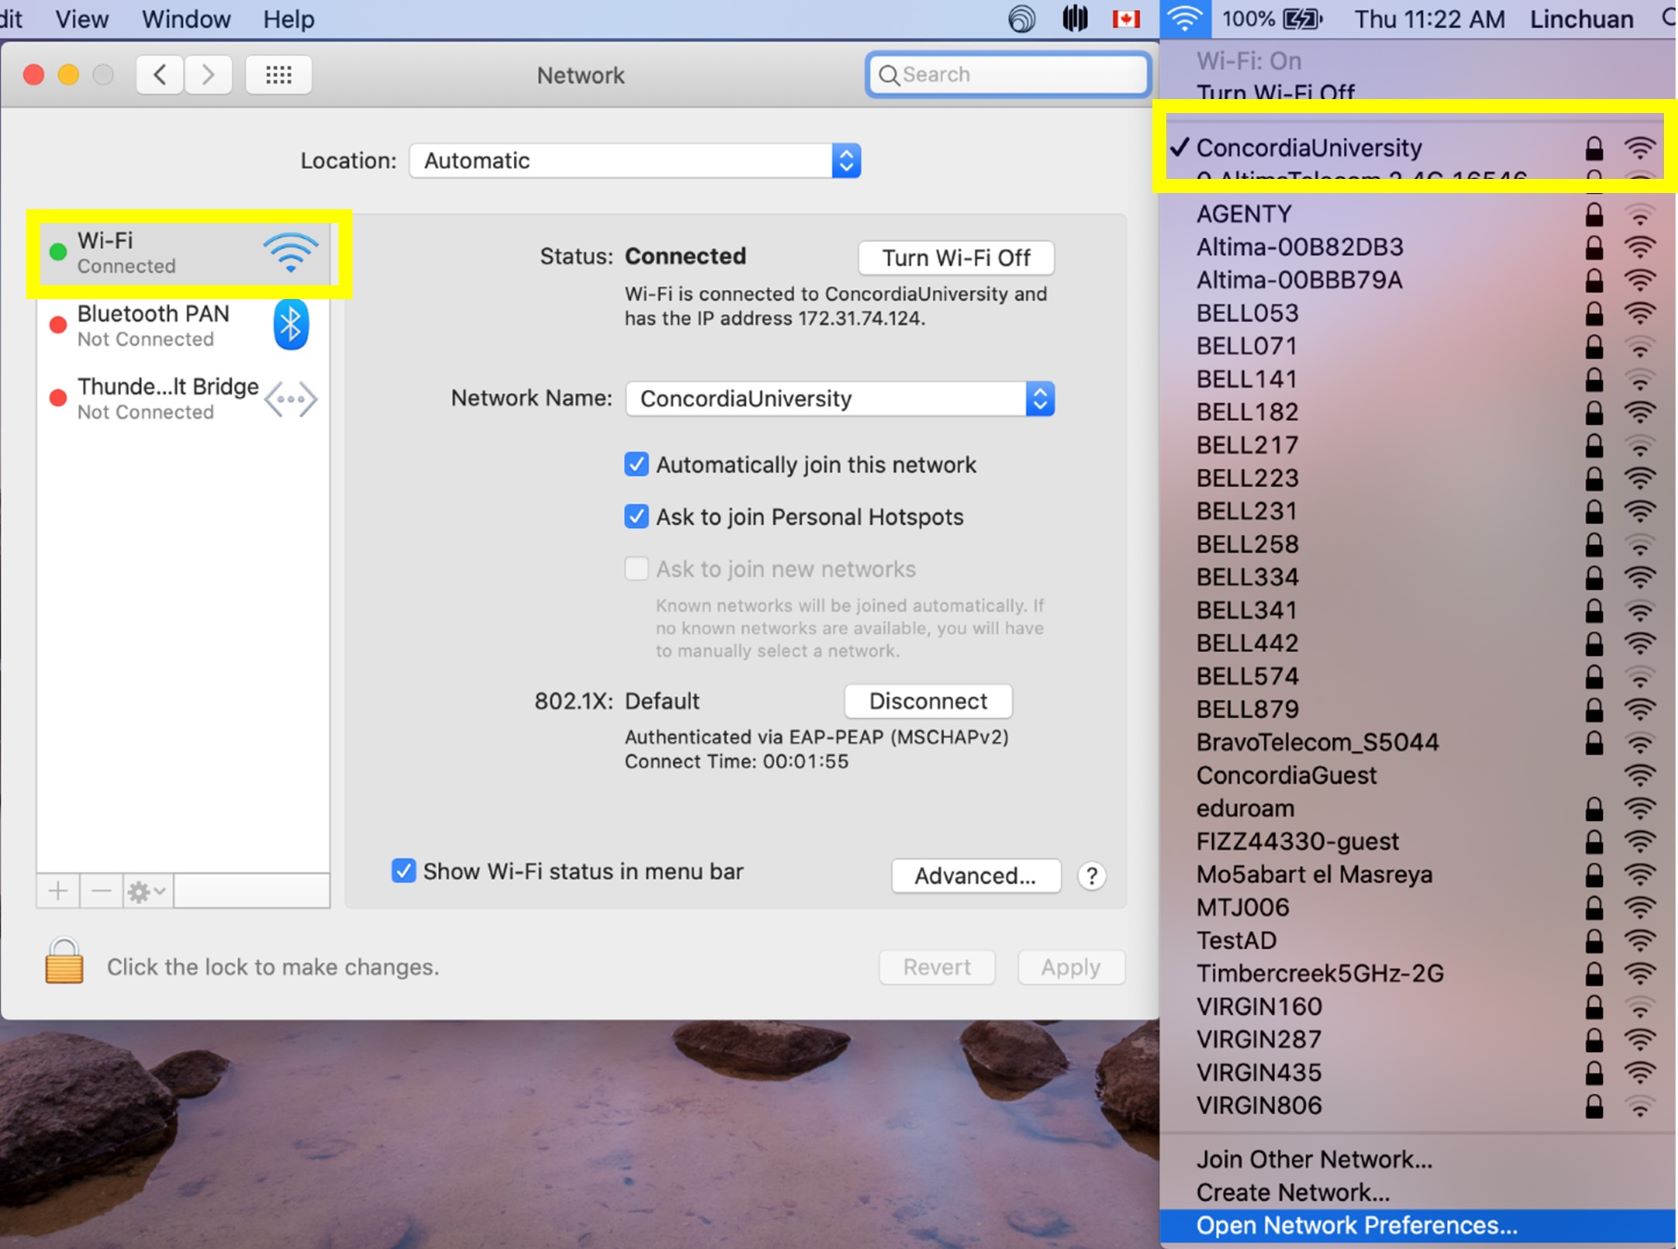
- Select ConcordiaUniversity from the wireless pull-down menu at the top right of your screen.
- Enter your Concordia e-mail address and password when prompted.
For new students and employees and you did not receive your e-mail address, please use your Concordia netname and password. You can manually modify it after getting your e-mail address.
- Click Remember this network if you would like your computer to automatically connect to Concordia's wireless network.
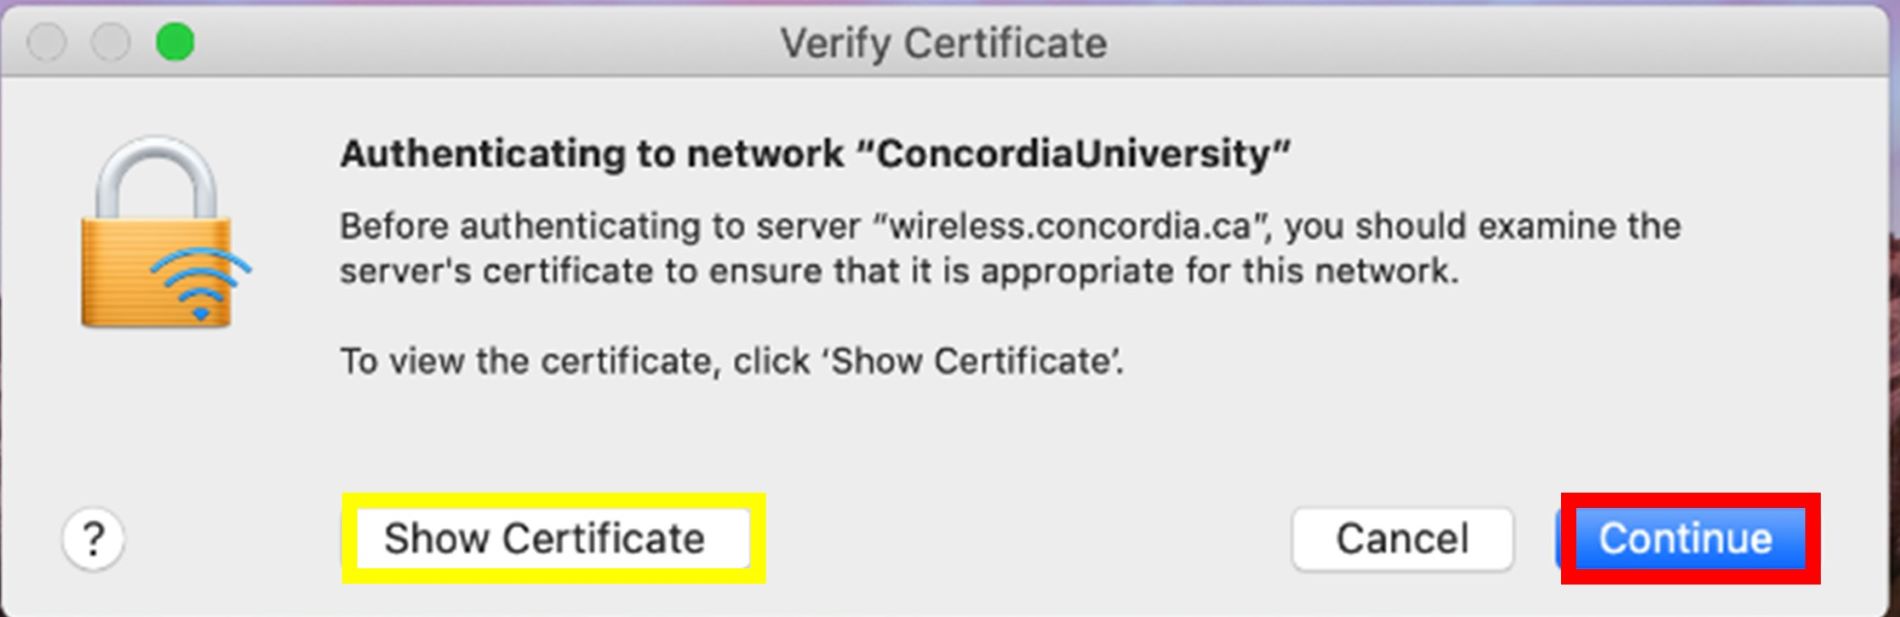
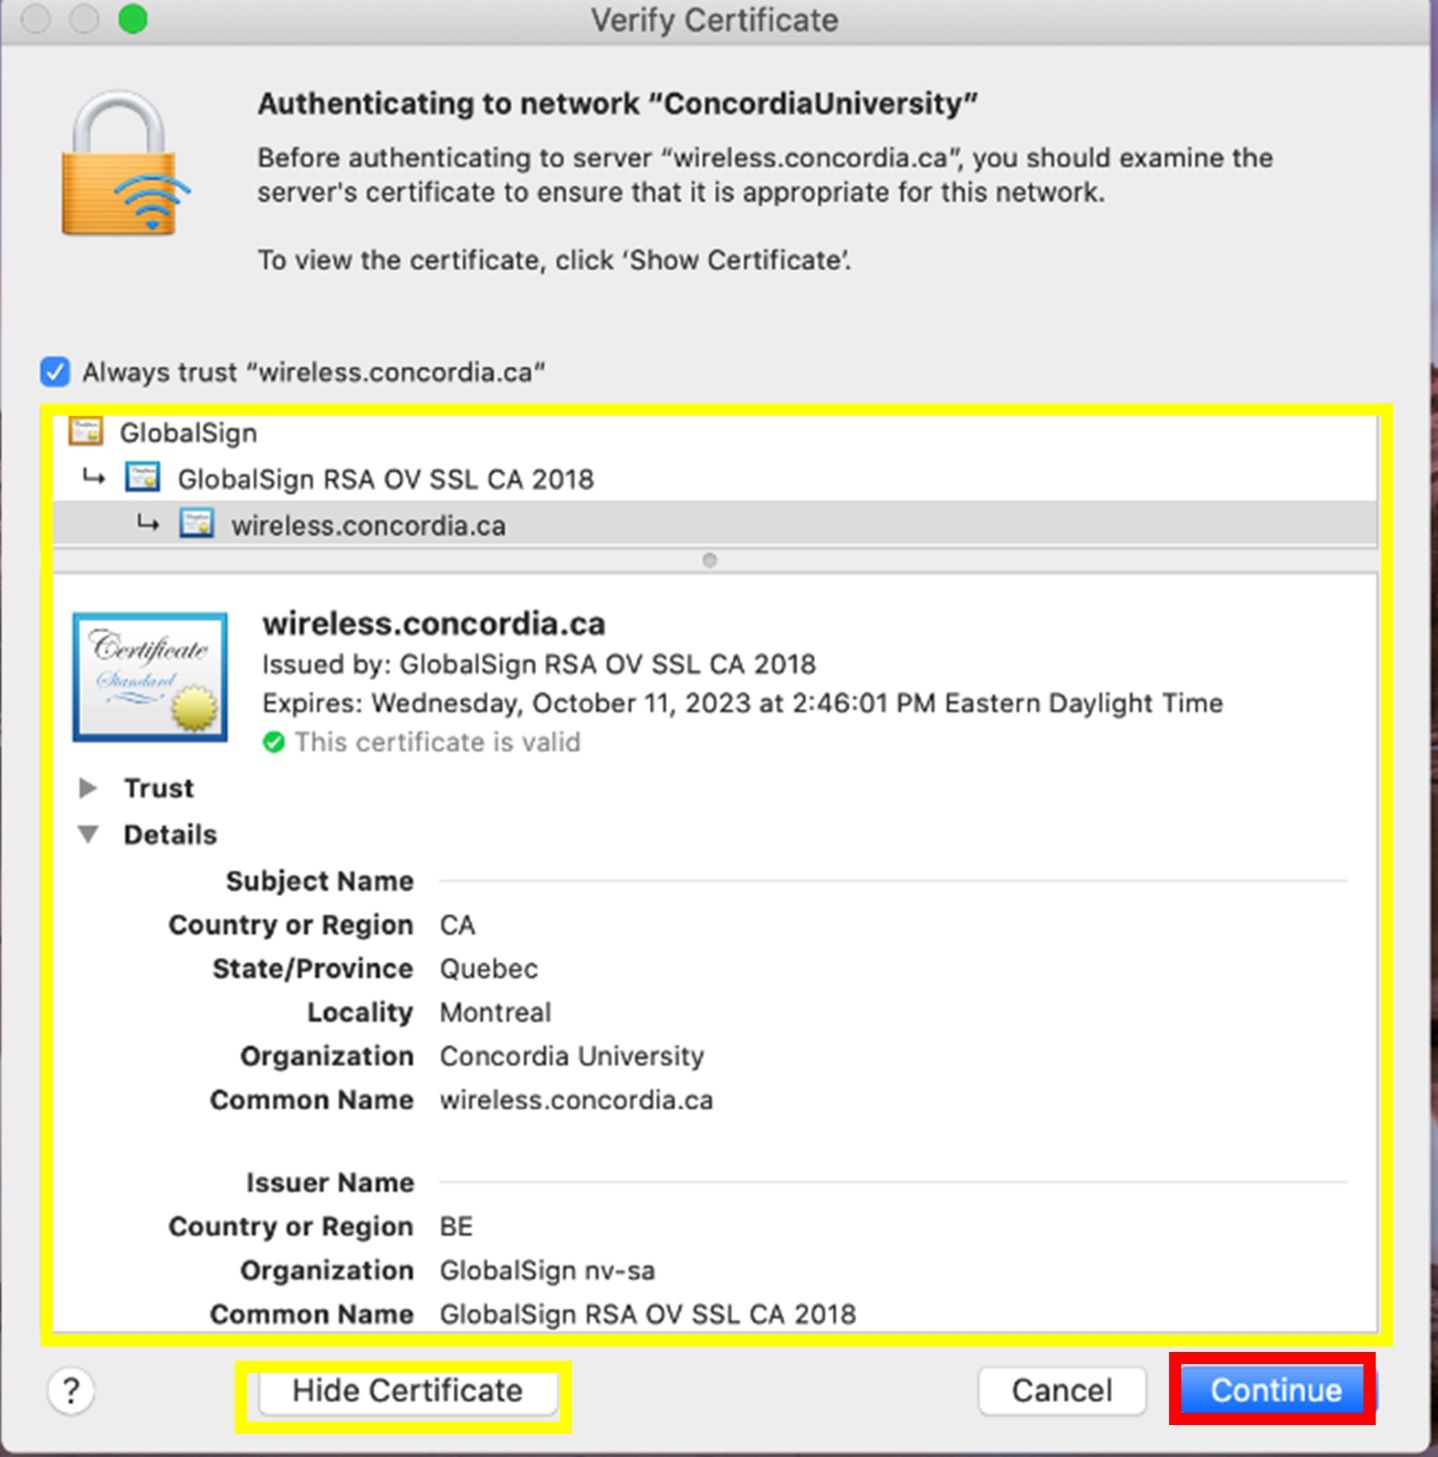
- Click continue to accept the certificate when prompted. If you click “Show certificate” should be issued to CA, QC, Montreal, Concordia University, IITS, wireless.concordia.ca and issued by ‘GlobalSign …’.
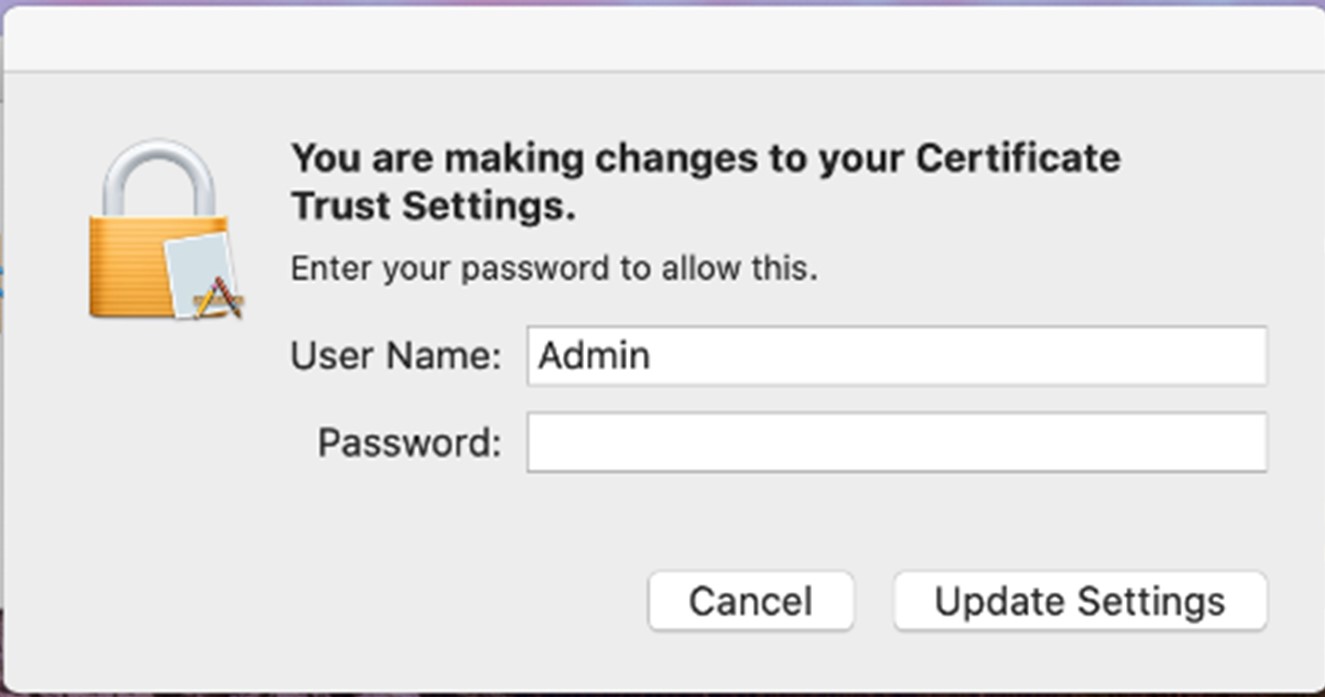
- You will be prompted to put in your admin (local) username and password. This is a username and password you would have created upon purchase of the computer.
- You should now be connected to the Concordia University network. To verify your connection go to the Wi-Fi pull down menu > Open network preferences and ensure that there is a green dot beside the Wi-Fi connection.
This document describes the procedure used for connecting systems using Apple’s Os X Snow Leopard (10.6) to the Concordia University Wireless network using the PEAP and WPA2 protocols. The instructions here may not work on earlier versions of OS X (i.e., 10.4, 10.5) and may vary depending on your configuration. For further information on OS X wireless support, please visit the Apple website.
If this is your first time connecting, you may be prompted to accept a certificate. This process should occur when you first log onto the network, but may happen earlier. The steps for certificate acceptance are found at the end of this document.
Steps to follow:
While there are other methods to connect to the network, we’d suggest you create a User Profile with the settings below stored in it. This will allow you to automatically connect to the network wherever it is available. If you have already created a profile, do not repeat this step.
- Open the System preferences > Network.
- Select AirPort > Advanced > 802.1x (tab)
- Please verify that another user profile for Concordia University's wireless network is not already present. If you already have a profile and the settings are correct, do not create a new one.
- Under the user profiles menu, select the [+] button, then select Add user profile
- The name of the network should be Concordia University
- In the username and password fields, type your Concordia e-mail address and password.
- Optional: If you wish to be prompted for your password each time you log in, ensure the Always prompt for password box is checked.
- In the authentication area, ensure that PEAP is checked.
- In the Wireless Network pulldown, select ConcordiaUniversity. This will set the profile you have built to work automatically on the Concordia network. Ensure that WPA2 Enterprise is selected as a security type. Click OK.
The protocol used to secure Concordia’s wireless network is not supported on early versions of the iPhone Operating System. Updating your iPhone OS to the latest version is encouraged. For further information, please visit the Apple website.
Steps to follow:
- To connect to the Concordia University wireless network on your iPhone, open the Settings application from your home screen.
- Open the Wi-Fi menu and select the Other network. You will then be prompted for a Network name, Security setting, Username and Password:
- Network name: ConcordiaUniversity
- Security setting: WPA2 Enterprise
- Username: Concordia e-mail address
- Password: Concordia e-mail address password
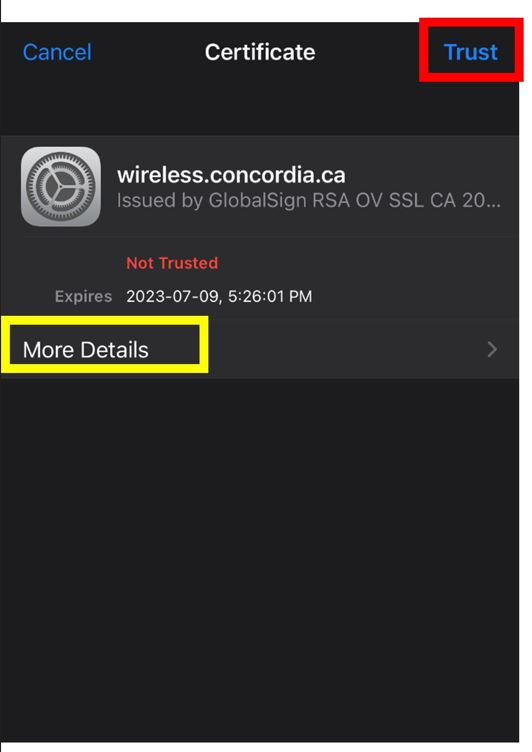
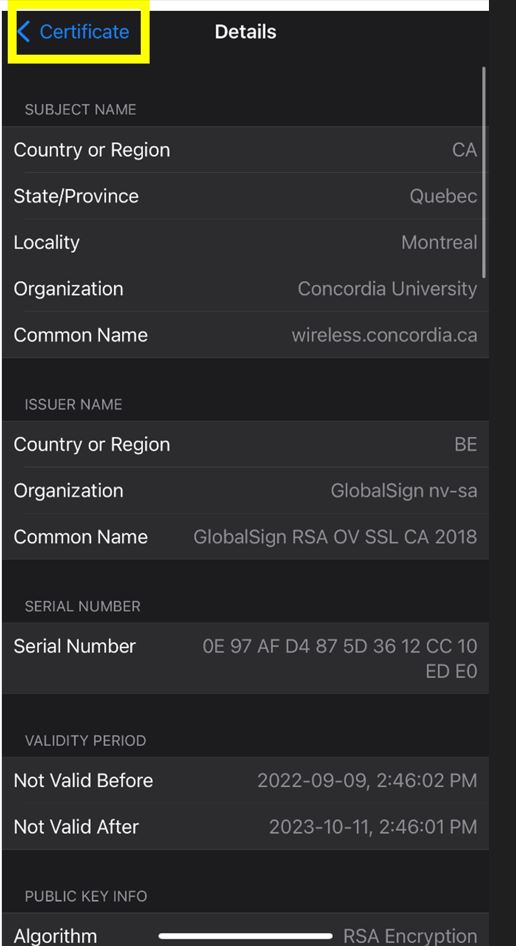
- After correctly entering your netname and password, you will be prompted to accept an certificate. If you click “Show certificate” should be issued to CA, QC, Montreal, Concordia University, IITS, wireless.concordia.ca and issued by ‘GlobalSign …’.
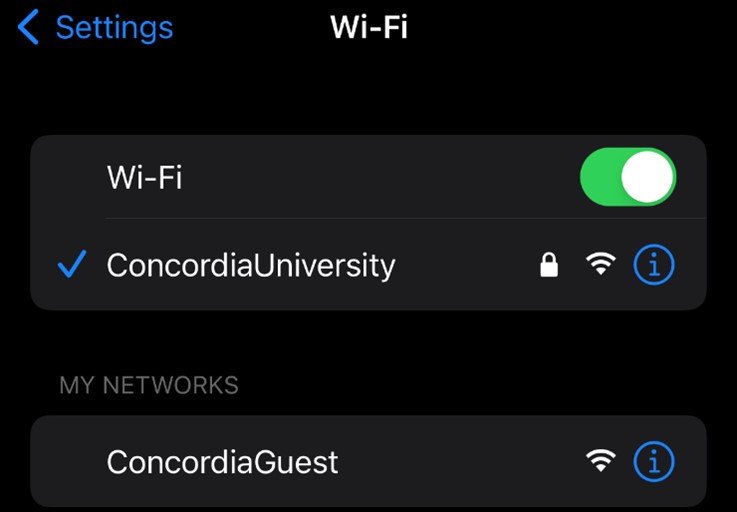
- Once the certificate has been accepted, you will be brought back to the Wi-Fi screen and "ConcordiaUniversity" should have a checkmark next to it.
1. Adding a new wireless network name "ConcordiaUniversity"
2. (Option) Choose 802.1x EAP from the Security drop-down menu
3. Choose WPA/WPA2-Enterprise for from the Security drop-down menu
4. Choose PEAP from the EAP method drop-down menu
5. CA Certificate: Use system certificates (For some model of Android 8 devices, if there is not the option “Use system certificates”, please select “Don’t validate”).
6. Domain: wireless.concordia.ca
7. Identity: Your Concordia e-mail address
8. Anonymous identity: Empty
9. Password: Your Concordia e-mail address password
10. Enable Auto reconnect
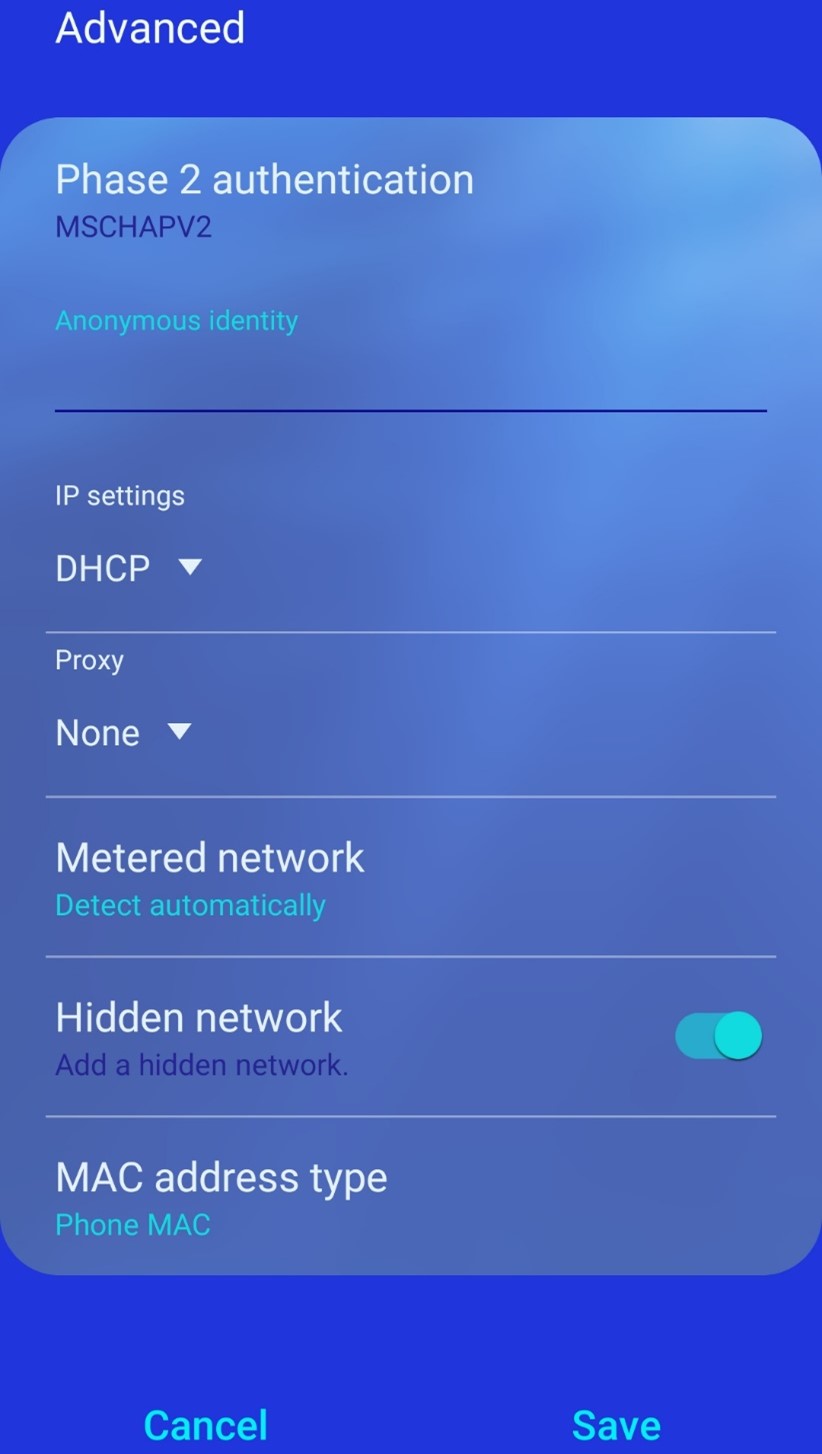
11. In Advanced
(Option) Choose MSCHAPV2 from the Phase 2 authentication drop-down menu
MAC address type: Device (or Phone) MAC
For new students and employees, if you did not receive your e-mail address, please use your Concordia netname and password (You can manually modify it after getting your e-mail address).

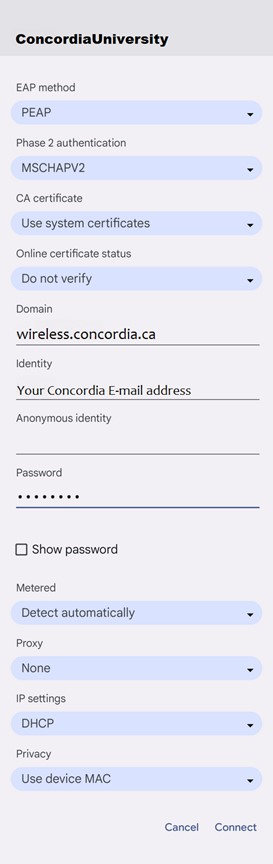
1. Adding a new wireless network name "ConcordiaUniversity"
2. EAP method: Select PEAP from the drop-down list
3. Phase 2 authentication: Select MSCHAPV2 from the drop-down list
4. CA Certificate: Select Use system certificates from the drop-down list
5. Online certificate: Select Do not verify from the drop-down list
6. Domain: wireless.concordia.ca
7. Identity: Your Concordia e-mail address
8. Anonymous identity: Empty
9. Password: Your Concordia e-mail address password.
10. Enable Auto reconnect
11. Privacy: Choose Use device MAC from the drop-down list
For new students and employees, if you did not receive your e-mail address, please use your Concordia netname and password (You can manually modify it after getting your e-mail address).
1. Network name "ConcordiaUnviersity"
2. Security: Select WPA/WPA2-Enterprise from the drop-down list
3. Identity: Your Concordia e-mail address
4. Password: Your Concordia e-mail address password.
5. CA Certificate: Select Use system certificates from the drop-down list
6. Domain: wireless.concordia.ca
7. Hidden network: Turn off
8. EAP method: Select PEAP from the drop-down list
9. Minimum TLS version: Select TLS v1.2 from the drop-down list
10. Online certificate status: Select Do not verify from the drop-down list
11. Phase 2 authentication: Select MSCHAPV2 from the drop-down list
12. Anonymous identity: Empty
13. IP settings: DHCP
14. Proxy: None
15. Metered Network: Detect automatically
16. Mac address type: Select Phone MAC from the drop-down list
For new students and employees, if you did not receive your e-mail address, please use your Concordia netname and password (You can manually modify it after getting your e-mail address).

How to connect to the ‘ConcordiaGuest’ wireless network
Once you have received the wireless access code, follow the instructions in the document below to connect to the ConcordiaGuest wireless network.
FAQ
‘ConcordiaUniversity’ wireless network
Please use your Concordia e-mail address and your password to login to the wireless network.
For students, the email format is netname@live.concordia.ca.
For employeese, the email format is firstname.lastname@concordia.ca.
Officially, Concordia supports: Mac OS X, iPhone, iPad, iPod touch, Blackberry, and Android.
IITS is unable to provide specific instructions for devices not listed above. In addition, the IITS Service Desk and service areas are unable to provide official support for devices running Linus and Unix platforms. To aid in the setup, please refer to Concordia's wireless authentication protocol, listed below.
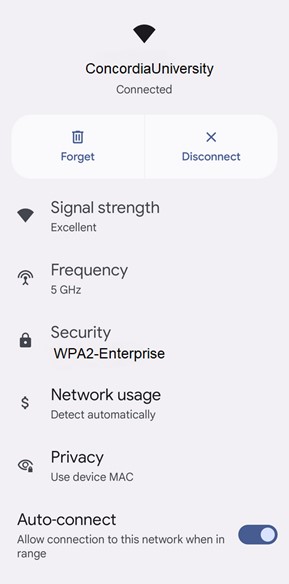
SSID: ConcordiaUniversity
Authentication: WPA2 Enterprise
Encryption: AES
802.1x/EAP type: PEAP
Authentication method: MS-CHAP V2
We do not support Windows XP, 7, 8, and Vista anymore
When you successfully log on to a wireless or wired network that uses Protected Extensible Authentication Protocol (PEAP) authentication, your credentials are automatically stored in the computer for reuse. This may sometimes interfere with your computer's ability to accept new credentials.
The wireless.concordia,ca certificate is used to prove that the authentication server you are authenticating to is in fact the correct server. It will protect your devices from the some security attacks (e.g. man in middle attack) which can steal your personal information (e.g. credential).
Concordia University only use the Public certificate issued from GlobalSign
The certificate should be issued to CA, QC, Montreal, Concordia University, IITS, wireless.concordia.ca and issued by ‘GlobalSign …’. Please find the detailed information for the certificate in the instruction of each operating system above.
‘ConcordiaGuest’ wireless network
To request a guest wireless access code, please fill the web form at least 5 business days prior to your date of usage.
Access codes are valid for a maximum of 1 week, but may be deactivated sooner depending on their intended purpose.
Self-registration, however, will reset every night at midnight. This means you will need to re-enter your name, email address, and phone number at the beginning of each day that you are using the guest wireless network.
Charges may apply when requesting access code for over 10 participants.
Rates and more information can be found on the Equipment Loan and Rental page