
The Virtual Private Network

The Virtual Private Network (VPN) allows Concordia staff, faculty, and students to securely access internal networks, shared drives, and certain software or websites when working off campus. By creating an encrypted connection to the Concordia network, the VPN allows you to use resources that are normally only available on campus.

This page explains how to install FortiClient VPN, connect to the service, and reconnect if Forticlient becomes unlicenced. 

How to install the VPN

 
To install FortiClient VPN on your computer, first choose the installer for your operating system and download it.


Use the guides below to help with download and installation:

Select the guide based on your operating system:

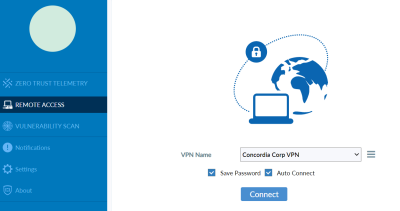
You'll need the invitation code in order to connect.  

How to connect to the VPN

After FortiClient VPN has been installed :

  • Select “Zero Trust Telemetry” tab on the left side of the application window.
  • You should see “FortiClient – Connected” and “Centrally Managed by EMS” as seen below.
  • If you do not see “Centrally Managed by EMS”, please follow the installation instructions above for Windows, macOS, and Linux. 
  • Click on Connect.
  • You will be prompted to enter your Concordia email address and password.


  • You will be prompted to approve your sign-in request with MFA.
  • The final screen will ask if you wish to stay signed in:
    • If you are using a personal computer, select “yes” so you won’t need to sign in again that day when accessing the VPN.
    • If you are using a shared computer (for example, one borrowed from the library), select “no” to prevent others from accessing your VPN connection.
  • You are now connected to the VPN. 

How to reconnect to the VPN if your software becomes "unlicenced"

If you notice that FortiClient becomes unlicensed, you’ll need to reconnect by following the following instructions and inserting the invitation code below. 

Reconnect the Zero Trust Telemetry:

• In the blue menu on the left, click Zero Trust Telemetry.

• Copy the following invitation code, and paste it into the Server Address or Invitation code field: 

Forticlient VPN invitation code

Copy and paste this invitation code into the Server Address or Invitation code field:

_VjE6bGVtcy5jb25jb3JkaWEuY2E6ODAxMzpkZWZhdWx0Ojk2ZjFhYWU2LTFiMzUtNDg5ZC1iZWZhLTE4NTM1ZDUwMzVmNQ==

Note: Please be sure to copy the entire code, and make sure that no extra spaces are included when pasting it.

• Click Connect. Wait 30 seconds. A browser window will open. 

• When prompted, click Accept. If prompted to do so, log in using Concordia email and password + MFA.

Log in to the VPN

• In FortiClient, click Remote Access.

• Select Save Password and Auto Connect (recommended).

• Click Connect.

• When prompted, authenticate with Concordia e-mail and password + MFA.

• You are now connected to the new VPN. 

FAQ

Follow the instructions to reconnect using the invitation code

If your VPN has suddenly stopped working, it may be because the VPN has undergone a recent update. Please reboot your computer and try to connect to the VPN again. If the VPN remain inaccessible following a reboot, please contact the Help Desk at help@concordia.ca or 514-848-2424 ext. 7613

You will only need to connect to the VPN to access certain hosted software applications, computer labs/servers or your work computer when you are off campus. The VPN will not encrypt or protect your internet navigation.

Here are examples of applications that require a VPN connection when you are off campus:

  • GCS mail service (@encs.concordia.ca mailboxes)
  • AEM
  • SAP

  1. From your home computer, open Remote Desktop Connection by navigating to the following location: Start > All Programs > Accessories > Remote Desktop Connection
  2. In the Computer field, enter the full computer name of your office computer (See Step 2).
  3. Select Connect
  4. You will be prompted to enter your credentials. Enter your netname in the following format: CONCORDIA\[yournetname]. In the password field, enter the password for your netname.  
  5. Select OK 

  1. From your home computer, open the App Store.

  2. Download and install Microsoft Remote Desktop.

  3. Open Microsoft Remote Desktop by navigating to Launchpad > Microsoft Remote Desktop.

  4. Click Add PC.

  5. In the PC name field, enter the full computer name of your office computer (from Step 1).

  6. Click Add.

  7. You will be prompted to enter your credentials. Enter your netname in the following format: CONCORDIA\[yournetname] as your username. In the password field, enter the password for your netname.

  • Click on the Windows icon (bottom left)

  • Click on Settings

  • Click on System

  • Click on About and look at the Device Name

Click the Apple Menu, located in the upper left-hand corner of the screen.

For macOS Ventura and newer:

  • System Settings
  • General
  • About

For macOS, Monterey and older:

  • System Preferences
  • Sharing

  • Open the FortiClient Agent and select the Zero Trust Telemetry tab
  • Select “Disconnect” under Centrally Managed by EMS
    • If this window says “Enter Server address or invitation code:”, there is no action required on your part
  • Next, open “Add or remove programs”
  • Find FortiClient VPN in the list of installed applications
  • Click the ellipses on the right and select “Uninstall”
  • Follow the steps in the uninstaller application until it is completed.

  • Open the Applications folder.
  • Find and run on the "FortiClientUninstaller.app" application.
  • Follow the steps in the uninstaller application until it is completed.
  • Once the application is uninstalled, restart your computer.

Need help? We are here to support you

For assistance you may reach the Service Desk via email at help@concordia.ca

Back to top

© Concordia University