Moving your course meetings online
Last updated: May 29, 2024, 2:13 p.m.
The following workflow guides you through the steps for moving your live classes into an online format. Online classes will be held using the web conferencing tool Zoom, facilitated through Moodle.
Step by step video
Moving Your Courses
Online 3-Step Workflow
Concordia will be using Zoom and Yuja to host and record online live virtual classes. To set up your virtual course meetings, follow these steps.
Review the workflows below to guide you through the process of:
- Adding the Zoom plugin to your Moodle course
- Scheduling Zoom classes for a course
- Starting a Zoom class
- Adding the YuJa pluging to your Moodle course
- Sharing your recorded Zoom sessions with Students
Before you begin: Activate your Concordia Zoom account
Concordia will be using Zoom to host online virtual classes. You must activate your Zoom enhanced licence before using Zoom for the first time. The Concordia account gives you many features not available in a standard free account, such as longer meeting times and interactive features.
Equipment checklist
You will need the following equipment to run virtual classes online:
- a desktop or laptop computer
- an up-to-date browser (Google Chrome is recommended)
- a reliable Internet connection
- a microphone (only for running your class on Zoom)
Concordia will be using Zoom to host online virtual classes. You must activate your Zoom enhanced licence before using Zoom for the first time. The COncordia account gives you many features not available in a standard free account, such as longer meeting times and interactive features.
Scheduling Zoom Sessions for your Moodle Course
1. Go to Moodle.concordia.ca and use your Concordia netname and password to login to Moodle.
- Once logged in, you will see a list of courses in the grey sidebar on the right.
- By default all courses are assigned a Moodle course page at the beginning of the term that can be accessed at any time. They remain inactive until you activate it; therefore, students will not see your course or its content until you change the setting to make the course visible to students.
- If you have already activated your course, it will appear under the heading MY COURSES in the Navigation Drawer in the left-hand side.
- If you have not activated your course, it will appear under the heading More courses (including new courses). The courses under this heading appear as grey links, which signifies that they are not visible to students. Steps for making your course available to students can be found further down this page.
2. Click the course for which you would like to schedule the virtual course meeting.
- Understanding your Moodle Course Name
- To locate the appropriate course for this term, you will need to understand the Moodle name. It consists of the course code, section, year and term. For example, if we take the Moodle Course Name: ENGR 201 A 2204
- Course code: ENGR 201
Section: A
Year: 220 The year codes are designated as follows: 2020 (220), 2019 (219), 2021(221)
Term: (4) The term codes are designated as follows: Summer (1), Fall (2), Fall/Winter (3), Winter (4) - The course Moodle page appears. [Note that the page is divided into weekly sections, and that the current week is highlighted with a blue background.]
3. In the top right-hand corner, click Turn editing on.
- You will notice that more options appear on the page to manage content.
- ! In order to add or edit any content in Moodle Editing needs to be turned on.

4. In the first topic section, click Add an activity or resource.
- The Add an activity or resource box appears with a list of activities you can add to your Moodle site.
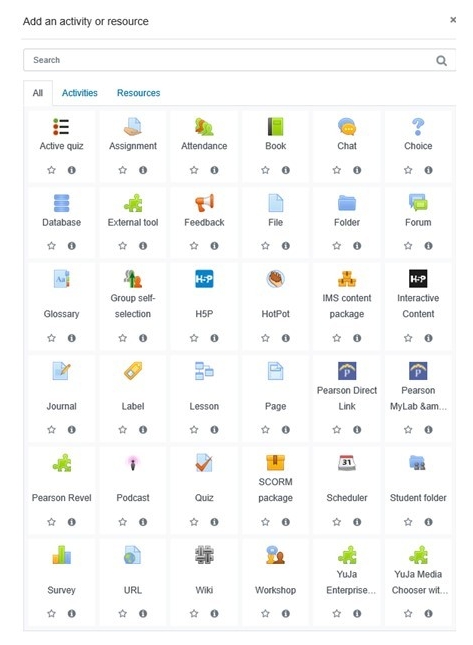
5. Click External tool, and click Add.
- The External tool setting box appears.

6. In the Activity name dialog box, type: [course number] Virtual Course Meetings
- For example, for PSYC 200, type PSYC 200 Virtual Course Meetings
7. From the Preconfigured tool dropdown, select Zoom Video Conference.

8. At the bottom of the page, click Save and display. One of two things will happen:
either:
(A) the Zoom Meeting page appears.
If you are using a Mac and the Zoom page displays an error, you may need to make a setting change to enable the Zoom tool. We recommend Chrome for use in Moodle.
To fix this, follow these steps:
- In Chrome, Click Chrome menu item in the top left-hand corner, and select Preferences.
- Under Privacy and Security (you may need to scroll down), click Site Settings.
- Turn off Block third-party cookies by clicking the toggle switch on the right.
If you are still experiencing difficulties, try logging out of Moodle and logging back in again and accessing the Virtual Course Meetings link again.
OR
(B) you will receive an Error (see below). If you receive the error, please log out of Moodle, and click here to email help@concordia.ca for assistance. We will fix this for you very quickly and you can start again at Step1. We sincerely apologize for this inconvenience.

9. In the top right-hand corner of the page, click Schedule a New Meeting.
- The Meeting information page displays.

10. In the When drop-down boxes, input the first class date, time of the first virtual class meeting.
11. In the Duration drop-down boxes, select the hours and minutes of the virtual class meeting.
12. Ensure the Time Zone drop down is set to Montreal
13. Select the Recurring meeting box to schedule weekly meetings at the same time.
- The recurring meeting options appear.

14. In the Recurrence drop-down, select Weekly.
15. Beside Occurs on: select the day(s) your course is scheduled.
16. Select the End date and select the date of the last class from the calendar.
17. Scroll to the bottom, and select Record the meeting automatically on the local computer.

18. Click Save.
- The meeting details have been saved and the settings are displayed.

19. To return to your Course home page, click the course code in the breadcrumbs at the top of the screen to the left.
In order for your students to access the course, you will need to make the course available. If your course is not yet visible to students, follow these steps to make the course available:
1. Navigate to your Moodle course home page.
2. In the Administration block on the right-hand side of the page, click Edit settings.
- The Edit Course Settings page appears.

3. Under General, change the Course visibility setting to Show.

4. Scroll to the bottom of the page and click Save and display.
- The course is now available to students.
You may want to send a message to students to notify them that you have activated the course and/or that you have posted the links to access the virtual course meetings. You can use the announcement feature to push out messages to students via email. Follow the steps below to send an announcement to students.
1. Navigate to your Moodle home page.
2. Click Announcements in the top section of the course page.
3. Click the Add a new topic button.
- The Announcements Editing window appears.
4. In the Subject line, write the topic of your message.
- For example, if you are writing to let students know that the links for the live virtual classes are available, you can write: Live virtual class links available
- Note: When students receive the message, the subject line always contains the Moodle course code at the beginning. For example, the message subject line would read: ABCD-201-A-2194>>Forums>>Announcements>>Live virtual class links available.
5. In the Message box, type the message for students.
- Note: It is possible to add attachments to your message, but students will need to log into Moodle to view these, so it is not recommended.
6. If you want students to receive the message immediately, select the Advance, then check the Send forum post notifications with no editing-time delay checkbox..
- If this box is not checked, there is a 30-minute delivery delay period wherein you can make edits to the message.
7. Click Post to forum to send the message.
- The message will also be available to students by clicking on the Announcements link on the Moodle course homepage.
Starting a Zoom class
Once you have scheduled all your reoccurring virtual course meetings through Moodle, you will be able to teach your first virtual class. To do this, follow these steps:
1. If you want to share any documents or websites with your students during the virtual class meeting, open them at this point. For example you want to display, PowerPoint slides, Word documents, images, etc.,
2. Go to Moodle.concordia.ca and use your Concordia netname and password to login to Moodle.
3. Click on the course for which you would like to teach.
4. Under Announcements, click on the virtual course meetings link you created (see step above: Scheduling Virtual Course Meetings through Moodle).
For example:
You will see a list of all your scheduled virtual course meetings.

5. A few minutes before your scheduled course time, find the corresponding virtual course meeting, and click Start.
- A new window will pop up prompting you to launch Zoom.

6. Click Open Zoom Meetings
- Your meeting session will open, and you will notice that your session is being recorded. Your audio will be on.

7. You can mute yourself until you are ready to start class. To mute yourself, click Mute at the bottom left hand side of the screen.

8. At the bottom left-hand side of the screen you will see a video icon with a diagonal red line. To enable your camera, click Start Video.
- You can now begin your lecture.

9. When you are ready to share any documents or websites, click Share.
- A window appears with all your opened documents.

10. Select the appropriate document and click Share.
- Note: Only one document can be shared at a time
- Note: If you are displaying a PowerPoint slide deck, select “Slideshow” mode for optimal viewing.

11. To stop displaying the document to your students, click Stop Share.

12. If at any point you want to share another document, repeat steps 9 and 10.
- It is recommended to pause your lecture every 10 to 15 minutes to address student questions in the Chat box, particularly during long lectures. When you do this, tell students what you are doing. For example, say “I am going to pause for a moment to look through the chat to see if there are any questions.” Alternatively, you can designate the last 10 – 15 minutes at the end of the class for questions.
- To open the chat box, click on the Chat icon in the bottom navigation bar.
13. When you are ready to end your virtual course meeting, click END Meeting for ALL at the bottom right-hand side of your screen.
- A pop up will appear indicating that Zoom is converting the meeting recording for viewing. You may convert your recording later by double clicking .zoom file located in the recording folder.

14. Another window will pop up asking you to select the folder where you would like the recorded files to be saved. Choose the appropriate folder on your computer and click OK.

15. Zoom will automatically save your recorded virtual course meeting as zoom_0.mp4, it is better to rename it more appropriately, for example Course code&number_date, for example ENGR201_March23.
Making Zoom Recordings available on Moodle
How to Add the Activity
Concordia uses Yuja, a video publishing and capturing tool to share videos securely on Moodle. After you have saved your recorded virtual course meeting, you will need to make the video available to students on Moodle. You can share your videos securely on Moodle by using YuJa, a video capturing and publishing tool. But first, you need to add the activity to your Moodle course.
Important note: If you wish to share your videos with your students, you must publish them to the YuJa course channel. DO NOT add or embed any links to the YuJa videos directly into the Moodle course. To ensure the privacy of your online lectures, publish your videos to the course channels only.
To add YuJa as an activity to your Moodle course:
1. Go to moodle.concordia.ca, and log in with your Concordia netname and password.
2. In the Navigation Drawer, click the course in which you want to post the activity.
3. In the top right corner, click Turn editing on.

Note: To add or edit any content in Moodle, editing must be turned on.
4. In the first topic section, click Add an activity or resource.

The Activity Chooser is displayed with a list of activities you can add to your Moodle site.
5. Scroll down, and then click YuJa Enterprise Video Platform.

6. Click Add.
7. In the Activity name box, type [Course code] Virtual Course Recordings.

8. Under Privacy, and then uncheck Accept grades from the tool.

9. Click Save and return to course.
- The [Course code] Virtual Course Recordings link is displayed at the top of your Moodle course page.
- Important note: The activity link is the door to your Personal media library and Shared course channels in YuJa. Add the activity link only once to your course page. By following steps 1-9 to add the activity, you have created a YuJa course channel. You will use this channel later to share your videos.
How to create a folder
Before you start uploading or creating videos, you can organise your personal media library with folders.
To create a folder:
1. On the Moodle course page, click the [Course code] Virtual Course Recordings link.

2. On the My Media action bar, click New Folder.
3. Type a folder name, (for example, ENGR 201 Recordings), and then click Save.
- Your new folder is displayed in your My Media library.
- Note: These folders are located in your personal library, which only you can see.
How to upload a video
After you’ve organised your library, you can start uploading videos.
To upload a video:
1. Click the folder in which you want to add the video.
2. On the My Media action bar, click Upload.
- The Add Media dialog box opens with the video option preselected.
3. Click Browse.
- The File Upload dialog box opens.
4. Find and click the video you want to upload, and then click Open.
5. Click Start Upload.
- The video is displayed as processing in your media library until the upload is finished.
How to publish a video
After you’ve uploaded your video, you can share it with your students by publishing it to the course channel.
Important note: If you wish to share your videos with your students, you must publish them to the YuJa course channel. DO NOT add or embed any links to the YuJa videos directly into the Moodle course. To ensure the privacy of your online lectures, publish your videos to the course channels only.
1. Hover your cursor over the video you want to publish, and then click Publish.
- The Publish to… dialog box is displayed.
2. On the All Channels list, scroll down and click the name of the course channel you want to publish your video to.
- The channel name is displayed under the heading Selected Channels.
3. Click Select.
- A message is displayed confirming that your video has been published.
- Your students can now access the videos through the Moodle course by selecting the [Course Code] Virtual Course Recordings link.
In some cases faculty have reported delays of several hours when uploading the MP4 video file to YuJa. This includes smaller video files as well as larger files. The Zoom Help Center website indicates that screen sharing recording will require about 20MB of storage an hour while video recording will use an estimated 200MB of storage an hour. These sizes will vary depending on the resolution and types of video or screen sharing content.
If you continue to experience delays when uploading the MP4 video files to YuJa, please email help@concordia.ca. IITS will contact users to help investigate possible delays related to file management and uploading.