How to Suspend Participant Activities in Zoom
Zoom has a simple security feature that allows the host to suspend all participant activities during a class meeting.
Last updated: July 18, 2023, 8:57 a.m.
You will need the following equipment to run virtual classes online:
Concordia will be using Zoom to host online virtual classes. You must activate your Zoom enhanced licence before using Zoom for the first time.
Here are some important steps to take when running your virtual classes in Zoom to help prevent Zoom bombing which happens when outsiders enter your class and disrupt it with unwanted behaviours and actions.
1. Always schedule your virtual class meetings in Moodle by using the steps we have outlined in the video and user guide. Do not share your classroom scheduled Zoom meeting links outside of Moodle on social media, keep the links secure at all times.
2. When scheduling your meetings always check to make sure you do not use your Personal Meeting ID. If you use your Personal Meeting ID anyone who has previously used it to access a course meeting or any other meeting will still have access to the ID and can therefore use it to enter other course meetings you have scheduled using that same Personal Meeting ID. If you see this option when scheduling your course meetings in Moodle, make sure it is deselected.

3. We recommend disabling Screen share by participants. Only the host (faculty/TA) can share screen. This is already disabled by default but check your own settings to make sure. See Customising Your Zoom Settings for details.

4. Lock your class after it has started. Tell your students that no one will be allowed to enter after the first few minutes. This will help keep outsiders out! Be sure to remind your students not to be late so they don't get locked out. Consider a 5 or 10 minute grace period at the start of class. Here's how to do it.
Once your class meeting has started select Manage Particpants. This will open the Partipants window.

Select More from the bottom of the Participants window. Then select Lock Meeting.

Select OK to confirm that no new attendees can join the meeting once locked.

5. When scheduling your Zoom classroom meetings be sure to disable these two settings as shown below, Join before host and Waiting room. This will help prevent visitors from entering before you get into your virtual class meeting. These are also turned off by default in the global settings but it is important to check to make sure these are both disabled when you schedule a course meeting in Moodle. See Customising Your Zoom Settings for details on how to access your personal settings in Zoom.

6. You can remove participants that are disrupting the class meeting from the session.
Select Manage Participants to open the participants window.

Select More next to the participants name and then select Remove.

Please see Customising Your Zoom Settings to learn more about how to secure your virtual course meetings.
Be sure to disable the setting as shown below, Only authenticated users can join meetings from Web client. This will allow students to access course meetings without being prompted to sign-in in order to access their Zoom/Zoom meetings. This setting is turned off by default in the global settings but it is important to check to make sure it is disabled if students indicate that they are being prompted to login to the Zoom meetings. See Customizing Your Zoom Settings for details on how to access your personal settings in Zoom.


How to Suspend Participant Activities in Zoom
Zoom has a simple security feature that allows the host to suspend all participant activities during a class meeting.
When set to capture your Desktop, Zoom will capture anything on your screen, including software you may be using to write specialized content. For example, the open-source software Formulator writing mathematical formulas or the online whiteboard Bitpaper for doing more advanced annotations than what's possible in Zoom. You can also run your Zoom meeting form a tablet to display drawing and annotations.
Tip for using a tablet: Start the meeting from your desktop and run the meeting as usual. Join the meeting from your tablet without signing in. From your desktop, make your table user "co-host" so you can toggle between the two devies for sharing slides on your desktop and drawing/annotating on your tablet.
Make sure you have scheduled your meetings in Moodle ahead of time. Refer to Scheduling Virtual Course Meetings Through Moodle for step-by-step Instructions.
Some TAs may have difficulties accessing Zoom meetings through Moodle depending on their assigned role in Moodle or their email address associated with Moodle. If TAs have problem, they can enter using a link the instructor provides for them (see instructions below on Sharing the Zoom Meeting Link with Others), or follow the instructions below:
1. After logging into Moodle, click ton your name in the top right-corner.
The user menu appears.
2. Click Switch Role to…

TAs should now be able to access the Zoom Session via the Moodle link.
To revert back to your default role, click on your name and click Return to my normal role.

There are many situations in which you may want to give access to your Zoom session with people outside of your class. This might include guest speakers, your TA or students from another section.
To provide access, all you need to do is send them the URL link, which they can then copy and paste into their browser. Follow the instructions below to find the shareable link.
1. On your Moodle home page, click the link to your Zoom Virtual Sessions.
2. Under the Topics heading, click the meeting for which you would like to get the link. It should be a blue link, which is probably the course code.

3. Next to Invite Attendees, a Join URL is displayed. Copy this link.
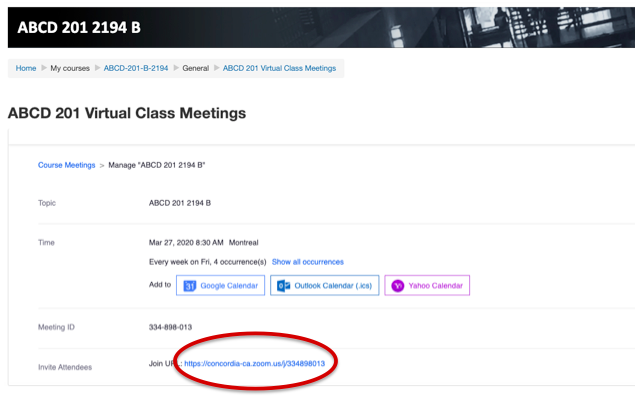
This is the link you can use to invite other to join. Once they click this link, the meeting will open for them.
Once you have scheduled all your reoccurring virtual course meetings through Moodle, you will be able to teach your first virtual class. To do this, follow these steps:
1. If you want to share any documents or websites with your students during the virtual class meeting, open them at this point. For example you want to display, PowerPoint slides, Word documents, images, etc.,
2. Go to Moodle.concordia.ca and use your Concordia netname and password to login to Moodle.
3. Click on the course for which you would like to teach.
4. Under Announcements, click on the virtual course meetings link you created (see step above: Scheduling Virtual Course Meetings through Moodle).
For example:
You will see a list of all your scheduled virtual course meetings.

5. A few minutes before your scheduled course time, find the corresponding virtual course meeting, and click Start.

6. Click Open Zoom meetings

7. You can mute yourself until you are ready to start class. To mute yourself, click Mute at the bottom left hand side of the screen.

8. At the bottom left-hand side of the screen you will see a video icon with a diagonal red line. To enable your camera, click Start Video.

To share files and documents on your screen with students, follow these steps:
1. When you are ready to share any documents or websites, click Share.

2. Select the appropriate document and click Share.

3. To stop displaying the document to your students, click Stop Share.

4. If at any point you want to share another document, repeat steps 2 and 3.
There many be several situations where you might like to make other participants in your session a co-host. A co-host can share their screen, so it may be necessary in the following situtuations:
To make a specific participant a co-host, follow these steps:
Options appear for this participant.
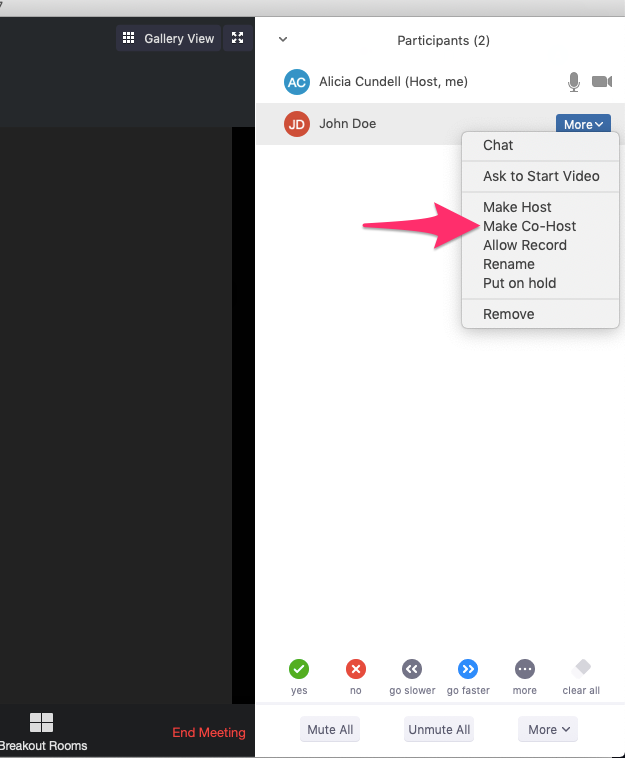
4. Click Make Co-Host.
That participant now has all the same options for the meeting as you have, including being able to share the desktop.
*****Please DO NOT select Make Host. You will lose your control over the meeting.**********
1. When you are ready to end your virtual course meeting, click END Meeting for ALL at the bottom right-hand side of your screen.
A pop up will appear indicating that Zoom is converting the meeting recording for viewing. You may convert your recording later by double clicking .zoom file located in the recording folder.

2. Another window will pop up asking you to select the folder where you would like the recorded files to be saved. Choose the appropriate folder on your computer and click OK.

3. Zoom will automatically save your recorded virtual course meeting as zoom_0.mp4, it is better to rename it more appropriately, for example Course code&number_date, for example ENGR201_March23.
Note for Mac Users: If you are not prompted for a location to save your meetings to, you can find your recorded meetings under Documents>Zoom
Zoom is configured to automatically mute all participants upon entry to the meeting space (your virtual classroom). However, students may unmute themselves at any time.
The following workflow will help ensure students are able to ask questions and maintain an orderly discussion:
Begin each virtual session with a brief reminder: (perhaps a PPT slide that you screen share with students at the beginning of every session)
Student mics should be muted at all times. *You can explain that the background noise will be distracting for everyone.
Show students how they can raise their hand during the class at any time with the following instructions:
Instructions for students who wish to ask a question:
1. Hover your mouse over the Dashboard (on the bottom of your screen)
2. Click on the Participants icon

3. You will see a list of participants and students who have raised their hands will appear at the top of the list (in the descending order).

4. When the instructor is ready to take your question, you will receive a prompt asking you to allow the instructor permission to unmute your mic.
Instructions for Faculty to Answer Student Questions:
1. Hover your mouse over the Dashboard (on the bottom or top of your screen)
2. Click on the Participants icon

3. You will see a list of participants and students who have raised their hands will appear at the top of the list (in the descending order).

4. Hover your mouse over the student name and click Unmute. The student will be asked if you can unmute them. Once they click Agree, their mic will be unmuted and they can ask their question.
5. As they ask their question, hover your mouse over their name and click Lower Hand and Mute.
Sharing a whiteboard (Zoom suuport documentation)
Enabling this selection will allow participants (students) to share whiteboard during a class meeting. The Whiteboard feature has been disabled by default to prevent participants from sharing whiteboard. Enabling this selection is not recommended and may lead to security risks and disruptions.
Using annotation tools on a shared screen or whiteboard (Zoom suuport documentation)
Enabling this selection will allow participants (students) to use the annotation tool to add information to shared screens. The Annotation feature has been disabled by default to prevent participants from adding information to shared screens. Enabling this selection is not recommended and may lead to security risks and disruptions.
Polling in Zoom (Zoom suuport documentation)
Zoom Polls are helpful to elicit feedback from students, to increase active participation during class, and to critically engage students with your content
Use Zoom Polls to check for prior knowledge when introducing a topic, confirm understanding of information from a reading or lecture, identify the key ideas from a lesson as a closure activity, etc.
If you think you’ll need assistance with this workflow, please contact us at teaching@concordia.ca.
We are here with you to help you through this process.
© Concordia University