1. Begin the session with an overview of the class because:
- Clarifying the learning goals helps increase student engagement
- Sharing your teaching purpose helps shape student expectations
Once you have determined the appropriate content for your Zoom session, plan a session that takes advantage of your time with students and the interactive features of Zoom. If the students would be better served by engaging with the content on Moodle, in their own time, to allow them to grapple with more complex content, or provide them more time to compose a considered response, consider switching platforms.
1. Record your Zoom session, publish it on YuJa, and post it on Moodle after every class
2. Ensure all microphones are muted during the session to avoid distracting noise
3. Acquaint students with interactive features you intend to use (chat, raise hand, whiteboard, etc.) and ensure all students practice before you employ them *See Tools section below for more detail
4. On the first day, set expectations and etiquette for using Zoom (i.e. do students need to raise their hands?). This could be something that you do as a class.
1. Alternative Host – when you schedule your session, you can identify an Alternative Host
2. Co-Host – During a meeting, you can name any participant(s) as Co-host
3. Meeting Control Bar – any tools you use during a meeting will be activated from the Control Bar, which is usually found at the bottom of your screen (at the top on ipads). If the Control Bar is collapsed, scroll your mouse over the bottom of the screen and it will reappear.
4. Use Screen Share to display slides, images with students
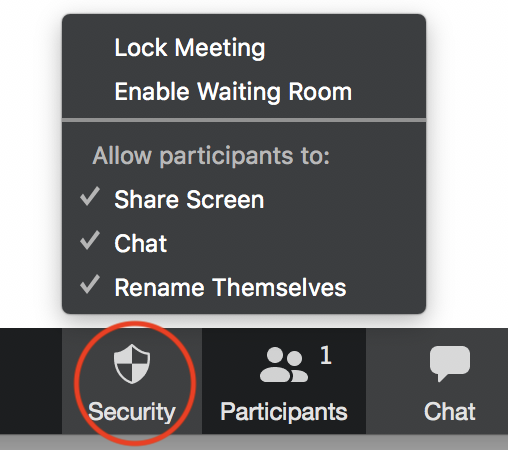
5. Use the Security icon to verify / change meeting settings or remove participants

Every instructor will use Zoom according to their own needs and those of the students.
Use live Zoom sessions judiciously. The recommended maximum duration of a Zoom session is 40-60 minutes. Limiting the time on Zoom will help mitigate for students

1. Begin the session with an overview of the class because:

2. Do a warm-up activity to get students talking or using the chat or other interactive features. (Example warm up activities)

3. If lecturing, divide your lecture into shorter segments (15 – 20 minutes maximum) and intersperse with student participation to maintain engagement. Plan for student interaction at regular intervals during the session at least every 5-7 minutes.

4. Take advantage of the following features: chat, polling, breakout rooms, etc. (See Zoom Tools for Facilitating Interaction below.)

5. Do a closing activity.
Many students might feel shy or uncomfortable showing themselves on camera and could also be reluctant to speak out on the mic. One of the benefits of Zoom is that it allows for multiple ways of engaging, and many students can participate at the same time without showing their faces or speaking on the mic.

Non-verbal feedback tools are helpful to elicit feedback and maintain student engagement during the session. Best of all, the use of these tools do not require any special settings changes or advance planning, so many of these can by used ‘on the fly.’
These buttons can be found at the bottom on the Participants window (some may need to click more to see all available options).
| Button | Function | How to use it in teaching |
|---|---|---|
| Raise Hand | When students click this, their names will appear in your Participant list in the order that they raised their hand (descending) with the hand icon next to it. | It may be difficult to keep an eye on the Participant List all the time during a Zoom session, so you may want to pause every few minutes to invite questions and answer them in order. |
| Yes and No | When students click either button, their answer will appear beside their name in the Participant list. | This is an efficient way of getting feedback from students on the fly. You can use it ask yes/no-type questions that ask students:
|
| Go slower and Go faster | These buttons are to be used by students to signal the pacing of an activity, lecture, review, etc. | Since you won’t always have the usual visual cues as a face-to-face environment, this is a good way to get feedback from students on the pacing of the session. However, students may be shy to use these buttons without prompting, so consider asking them periodically to provide feedback on the pace. |
| Thumbs up/Thumbs down | These buttons are used to show agreement or disagreement with what is being said without interrupting the speaker. | You can encourage students to use these to show when they are in agreement or disagreement with what is being said in the moment by you or by their peers, and not just when prompted. In order to get students using this feature, instructors are also encouraged to use this to model appropriate use. |
| Clap | This button is a gesture participants can make to thank, congratulate, acknowledge other participants or the host. | You can encourage students to use these to show when they wanted to emphasize the importance, bravery of or accomplishment (i.e. solving a difficult problem) related to what is being said in the moment by you or by their peers. In order to get students using this feature, instructors are also encouraged to use this to model appropriate use. |
| Need a Break | This button signals a suggestion from a participant for a pause in the session. | The instructor should decide whether or not they want to elicit this feedback from students or not and make this clear at the beginning of the course. If you do, be prepared to take periodic breaks as requested by students. |
| Away | This signals that a participant has stepped away from the session briefly. | It is recommended that students signal to the class if they need to step away from their computer. This will alert the instructor not to call on the student or assign them to a breakout room until their return. |

Instructors launch multiple-choice type questions for students to answer anonymously. Results can be optionally displayed to participants.
Polls are an effective way of increasing active participation in a Zoom session while also giving instructors feedback on student learning. Use Zoom Polls to check for prior knowledge when introducing a topic, confirm understanding of information from a reading or lecture, identify the key ideas from a lesson as a closure activity, etc. Other uses include (ungraded) diagnostic-type quizzes, reading quizzes and other concept-checking questions to help guide the day’s discussion.
Set up required to use polls: Poll questions can be added in advance of a session. Once the meeting has been created, access your meetings from the web browser interface (not the application on your computer), and click the scheduled meeting from the list of Meetings. Polls can be added at the very bottom of the Meeting page. (Watch the Video: Polling for Meetings).
It is also possible to add poll questions once you have started the meeting.
The chat box can be a very powerful tool to elicit feedback and critically engage students during sessions. Because no microphone or video is required, it is an inclusive way of promoting engagement and participation in your session. An additional advantage of the chat is that not a single person holds the floor in a given moment, many students can be participating and engaging in responses at the same time.
The chat box can be used in several different ways.
In large classes, it may be difficult to follow the chat at all times. If you do not have a TA to help filed questions or flag relevant comments, do not feel shy to pause periodically to review the chat. For example, you can say, “I’m just going to take a moment to review the chat to see if there are any questions.”
Set up required to use chat: By default, chat is enabled for all participants, so no special settings changes are required. (For more information see Controlling and Disabling in-meeting chat)
Annotation tools allow your students to markup the display screen, whether it’s the whiteboard or a slide that you have prepared for annotation. Annotation is another accessible way for students to participate without using mics or video. It is also a way to engage many students at the same time. Because it can also be done anonymously, students will feel less pressure to give the “correct” responses and be more likely to participate. For this reason, it is also ideal for discussing sensitive topics where students want to share thoughts, experiences and feelings anonymously.
Like many of the other interactive tools, instructors can integrate annotation interaction on the fly by “sharing” whiteboard at any time and inviting students to use the appropriate tool to respond.
Set up required to use Annotations tools: By default, the Annotation function is disabled, but it is possible to enable it in the Advanced settings. (For more information see Using Annotation Tools on a Shared Screen or Whiteboard).
In order for the Annotation tools to be enabled in a meeting, you have to be sharing your screen (for example a PowerPoint template) or a Whiteboard.

There are three main ways students can annotate on the screen:
1. Text Annotation
Students add a text box to the slide or whiteboard on the screen anonymously.
Here, you can post a question at the top of a slide or whiteboard (or in the chat) and invite students to add their answers. It is also ideal for brainstorming and problem solving. You can also ask students to write a word on a scale, timeline, rubric, or other graphic/template (see examples).
Tips: (1) If you have a large class, it may become cluttered, so pose questions that will elicit shorter answers, or ask students to rotate answering (by birthday month, for example) to limit the number of answers on one slide.
(2) The default font size for Annotation is quite large. Ask students to use the Format button to change the size of their text.
Note: Not all mobile devices have the option for adding text annotation. In this case, ask students to hand write using Draw or ask them to write in the chat box if they feel comfortable.
2. Draw
Using the draw button, students can draw on the screen using their finger or a stylus on a mobile device or a mouse on a laptop/desktop.
Students can use the draw feature to write answers instead of using text [especially those connected via mobile device]. You can also ask students to mark a scale, rubric, diagram, timeline, or other graphic or other template (see examples) with text.
Note: It can be awkward for people on desktop or laptops to draw with the house or trackpad, so this feature is most appropriate for those connected from a mobile device/tablet with a stylus.
3. Stamp
Several icons are available under the stamp menu item, including: and arrow, a checkmark, and “X”, a star, a heart and a question mark. Once a participant clicks the desired symbol, wherever they click next on the screen, the icon will appear.
There are several ways stamps can be used as follows:

Breakout rooms allow students to work in small groups during sessions. Students can be randomly assigned into rooms by an automated process controlled by the instructor based on the number of rooms designated for the activity. During the time students are in breakout groups, the instructor (and anyone with a co-host role) can circulate and enter any of the rooms to check in on students. It is also possible for students to signal to the instructor that they need help.
Breakout rooms are a good way to increase social engagement in an online course by giving students the opportunity to interact with other students and engage in peer teaching. The most effective use of break out rooms is to give students a clear and focused task to complete. For example:
Provide clear instructions for tasks. Note they will not be able to see slides once they move into the breakout rooms, make them available elsewhere (e.g. session slides made available in advance).
Note: If you are recording your meeting, note that breakout rooms are not recorded except for the time the instructor spends in individual breakout rooms. In other rooms, the recording show exactly what the instructor sees and hears.
Set up required to Breakout rooms: By default, the Breakout room function is disabled, but it is possible to enable it in the Advanced settings. (For more information see Enabling Breakout rooms and Managing Breakout Rooms)

1. Use Google Chrome browser for the most stable connection
2. Turn off video if internet connectivity is lagging
3. Open Participants box to mute any participants manually
4. Disable Chat feature if students are having side chats that are unrelated to course content and potentially distracting for others
a. Note: this can be done during the session through the Security icon on the Meeting Control Bar
5. Instruct students to leave the session immediately and contact you via email should they encounter any inappropriate behaviour during the Zoom session (Zoom-bombing, etc)
© Concordia University