Activating & customizing your Zoom account
Last updated: July 20, 2023, 10:19 a.m.
Zoom is a video conferencing tool that can be used in an academic setting to facilitate online learning. Faculty members can use it to provide lectures, tutorials and office hours. It is also helpful for online meetings, thesis defense, job interviews and guest speakers. All Concordia faculty and staff are entitled to an institutional account that provides advanced functionality. Refer to this page to find out to set up your institutional account and how to customize your account settings.
Equipment Checklist
You will need the following equipment to run virtual classes online:
- a desktop or laptop computer
- a reliable Internet connection
- a microphone
- camera (optional)
Concordia will be using Zoom to host online virtual classes. You must activate your Zoom enhanced licence before using Zoom for the first time.
Activating your enhanced Zoom licence (faculty, staff, TAs, RAs and all new employees e.g., exam invigilators)
To activate your Zoom licence, follow the following steps.
Follow these steps to activate your Concordia email address and request your employee netname and password. Please note that an employee email and netname are not the same as a Concordia student email account and netname. If you already have a Concordia employee email account, netname and password please proceed to 5. Obtain an @concordia.ca email address to activate and verify your employee account.
1. Visit the MyConcordia portal and select Activate your netname.

2. Select Employee Account

3. Complete the form as indicated and select Submit Request.

4. Once you have submitted your request you will automatically see your assigned netname displayed in the highlighted Netname field. You now need to create a password for your new netname in order to login to your Concordia employee account.

NOTE: If you have not received your Employee ID number please contact Concordia's Human Resources.
Phone: (514) 848-2424 ext. 3666
Email: hr-reception@concordia.ca.
Note: If you receive any errors during any of these steps please contact IITS
Phone: 514-848-2424 ext 7613
Email: help@concordia.ca
5. Obtain an @concordia.ca email address
In order to use Zoom at Concordia University you need to have @concordia.ca email address. To activate your email account for the first time, visit the Concordia Email page and sign in using your Concordia netname and password.

A message will appear indicating that you have successfully activated your email account
6. Authenticate in Zoom
Go to https://concordia-ca.zoom.us/ and click Sign in. On the next page enter your netname and password and click Sign in.

NOTE: If you receive Error Code 2216 please contact help@concordia.ca
Please include following information (TAs must have approval from the course faculty instructor):
- your name
- your staff netname
- your @concordia.ca email address
- short name of the course you are TAing (ex. PSYC 101 A 2194)
- name of the teacher of the course
Make sure to 'cc the faculty instructor in this email and mention that you need TA access for Zoom.
Some TAs may have difficulties accessing Zoom meetings through Moodle depending on their assigned role in Moodle or their email address associated with Moodle. If TAs have problem, they can enter using a link the instructor provides for them (see instructions below on Sharing the Zoom Meeting Link with Others), or follow the instructions below:
1. After logging into Moodle, click ton your name in the top right-corner.
The user menu appears.
2. Click Switch Role to…

TAs should now be able to access the Zoom Session via the Moodle link.
To revert back to your default role, click on your name and click Return to my normal role.

Using the Zoom application (app)
Downloading the Zoom application (app)
Follow these simple steps to download the Zoom client application, make sure it is up to date, and connect it to Concordia Software Client:
1. Go to the Concordia Zoom web conferencing portal.
2. Download the Zoom client application from https://concordia-ca.zoom.us/download.
Note: Mobile users can download the mobile application directly to their device by visiting the app store (iTunes, Google Play Store, etc.) and searching for the 'Zoom' application.

Once the download is complete, open your Zoom client application.
Logging into the Zoom app
1. Click Sign in.
2. To make sure to connect to the Concordia Software client, click Sign In with SSO.

3. In the “Company Domain” field, type: concordia-ca, then click Continue.

4. In the pop-up window, sign in using your Concordia netname and password
5. Click Launch Zoom.
Updating your Zoom application
In order to take advantage of the new regularly-released feautres and security updates, be sure to update your Zoom app regularly. To ensure that your Zoom application is up to date:
1. Open your Zoom app.
2. Click on the profile picture (or picture placeholder with your initials) in the top right corner of your application interface.
3. Select Check for Updates from the drop-down menu.
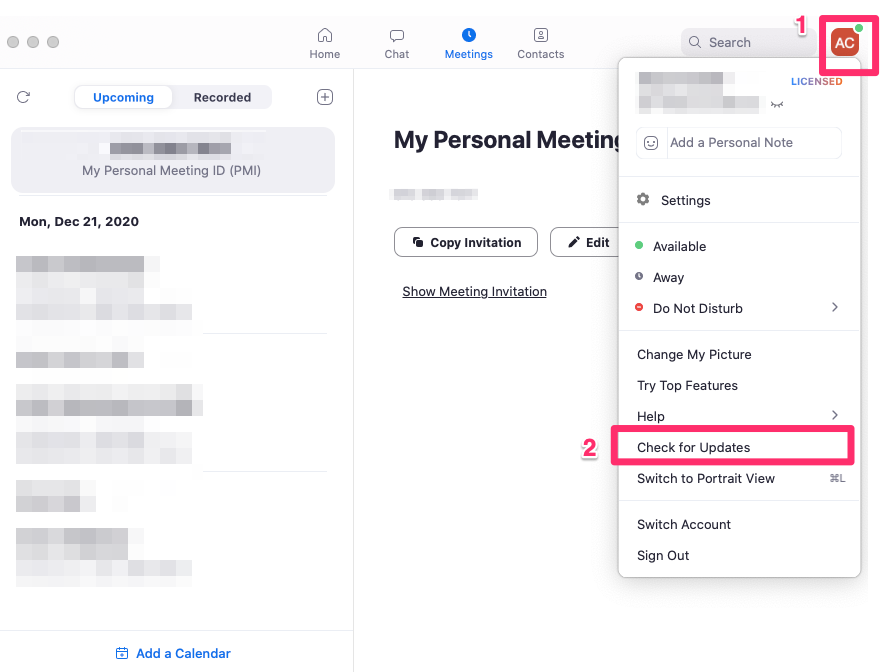
4. Click Update (if applicable).
Customizing your Zoom settings
Some default settings in Zoom have been modified to provide a more secure and safe Zoom virtual classroom environment. You may need to modify your personal settings to regain access to some interactive features. To access to some of the interactive features of Zoom (e.g., whiteboard, breakout rooms, student screen-sharing, etc.) you will need to reactivate these settings by logging into your personal Zoom accounts and modifying the default settings.
- To access your personal settings go to https://concordia-ca.zoom.us/ and click Sign in.
- On the next page enter your netname and password and click Sign in.
- Select Settings from the left side navigation and you will now see a list of options under Meeting.
Scroll down the Meeting page to find the settings you would like to re-enable.

Note: Re-activating these features will make your Zoom sessions less secure so please be sure to monitor your course for possible disruptions.
File transfer
Enable this selection on to make the File Transfer feature available. This feature allows hosts and participants to send files through the in-meeting chat. The File Transfer feature has been disabled by default to prevent file sharing. Enabling this selection is not recommended and may lead to security risks and disruptions.

Screen sharing
Only the host (Faculty/TA) can share their screen with the participants (students). The Screen sharing feature has been disabled by default to prevent students from sharing their screens. Changing this selection to All Participants is not recommended and may lead to security risks and disruptions.

Note: Without enabling this setting, it is possible to allow screensharing within the meeting controls while in a meeting.
Annotation
Enabling this selection will allow participants (students) to use the annotation tool to add information to shared screens. The Annotation feature has been disabled by default to prevent participants from adding information to shared screens.It is recommended to only enable this feature if you plan to use annotations in your classes. Once enabled, it is possible to disable annotations in a meeting through the meeting menu.

Note: You may want to also enable the whiteboard to use annotation with the Whiteboard (below) feature. Otherwise, participants will only be able to annotate during screen share (i.e. on your powerpoint).
Whiteboard
Enabling this selection will allow participants (students) to share whiteboard during a class meeting. The Whiteboard feature has been disabled by default to prevent participants from sharing whiteboard. It is only recommended to enable this feature if you plan to use this feature.

Breakout rooms
Enabling the Breakout room feature will allow the host to split meeting participants into separate rooms. The Breakout room feature has been disabled by default to discourage the use of this feature for security risks and disruptions. Therefore, it is recommended to only enable this feature if you plan to use it.
Using Breakout rooms is a great way to increase engagement and promote active learning in live Zoom sessions. However, please note that ther are some security risks involved in using Breakout rooms, and so those faculty who choose to use Breakout rooms do so at their own risk. Faculty are reminded that if they do use Breakout rooms they must monitor these rooms at all times to make sure they are used only for appropriate course related activities.

Authentication
Be sure to disable the setting as shown below, Only authenticated users can join meetings from Web client. This will allow students to access course meetings without being prompted to sign-in in order to access their Zoom/Zoom meetings. This setting is turned off by default in the global settings but it is important to check to make sure it is disabled if students indicate that they are being prompted to login to the Zoom meetings. See Customising Your Zoom Settings for details on how to access your personal settings in Zoom.

Assistance
If you think you’ll need assistance with this workflow, please contact us at teaching@concordia.ca.
We are here with you to help you through this process.