Last updated: July 18, 2023, 8:57 a.m.
Using YuJa to create and publish lecture videos
Lecture capture is a way that you can record your voice and what's on your screen (and optionally video of you talking) in order to make it available in video format to students via Moodle. Lecture capture is a great way to create short bursts of content that can be watched at any time.
Before you begin: Equipment & software checklist
You will need the following equipment to run virtual classes online:
- a desktop or laptop computer
- a reliable Internet connection
- a microphone
To have the best experience with the software, please consider the following recommendations:
- Use the latest version of Firefox as your browser when accessing YuJa through Moodle.
- Enable cookies in your browser for all Moodle and YuJa features to function properly.
To pre-record your lecture from a personal computer, you first need to download the YuJa Software Capture application. Instructions are provided below.
Adding YuJa to your Moodle course
Downloading YuJa to your Computer
Before you can use YuJa to record videos, you will need to install the software to the computer you are working from. You may install it on both personal and work computers.
There are two ways to download YuJa:
- from your Moodle course
- from the Concordia YuJa site.
Downloading YuJa from Moodle
Before you proceed, make sure you have followed the steps above to add YuJa to your course.
NOTE: You must have already added YuJa to your course before beginning these steps.
To download YuJa to your personal computer:
1. On the Moodle course page, select the link to the YuJa activity page.

The My Media workspace is displayed in Moodle.
2. On the YuJa toolbar, select Create Recording.
The Create Recording dialog box opens with the option to download.
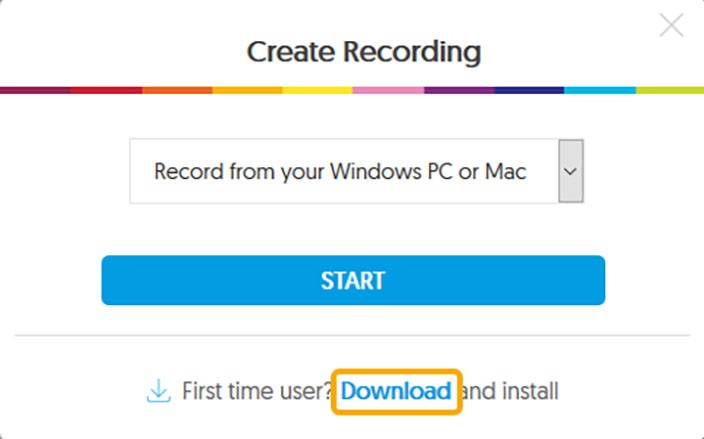
3. Select Download.
A pop-up is displayed asking if you would like to save the .exe file.
4. Select Save File.
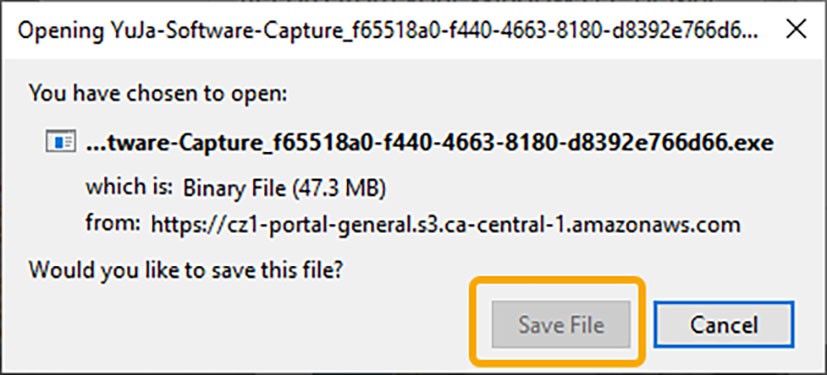
The YuJa-Software-Capture.exe file is displayed in your Downloads folder.
5. When the download is finished, select YuJa-Software-Capture.exe.
6. If your computer asks you to allow the application to make changes to your computer, select Yes.
The software is installed and a shortcut is created on your desktop. After the installation, the Software Capture application is launched on your computer.
How to capture voice and screen presentations
After the software download is complete, you can pre-record voice and screen presentations for your students. For example, you can simultaneously capture your lecture and PowerPoint slides on your screen.
To capture a voice and screen presentation:
1. On the desktop, select YuJa Software Capture.
Downloading YuJa from the Web
You can also download the YuJa software directly from the Concordia YuJa site. Log into the site using your Concordia netname and password and follow the instructions.
Recording a video with YuJa
The following resources provide instructions on how to record a lecture from your laptop or desktop that captures your voice and screen (and optionally video of you talking).
Teaching considerations when creating online lectures
It is recommended that instructional videos be limited to 10 minutes (or shorter) segments and, where possible, adding a short activity that prompts students to put the ideas to action. These activities could include: reflective or discussion questions for students to discuss in groups in a discussion forum, a quiz or other activity.
The following video provides instructions on how to record a video from your computer using the YuJa software application.
YuJa Support videos
Sharing videos with Students
Once you are ready to share your video with students, you will need to "publish" them to the YuJa course channel in order for students to be able to access them. Please follow the instructions below to publish your video to a course channel.
How to Add the Activity
Concordia uses Yuja, a video publishing and capturing tool to share videos securely on Moodle. After you have saved your recorded virtual course meeting, you will need to make the video available to students on Moodle. You can share your videos securely on Moodle by using YuJa, a video capturing and publishing tool. But first, you need to add the activity to your Moodle course.
Important note: If you wish to share your videos with your students, you must publish them to the YuJa course channel. DO NOT add or embed any links to the YuJa videos directly into the Moodle course. To ensure the privacy of your online lectures, publish your videos to the course channels only.
To add YuJa as an activity to your Moodle course:
1. Go to moodle.concordia.ca, and log in with your Concordia netname and password.
2. In the Navigation Drawer, click the course in which you want to post the activity.
3. In the top right corner, click Turn editing on.
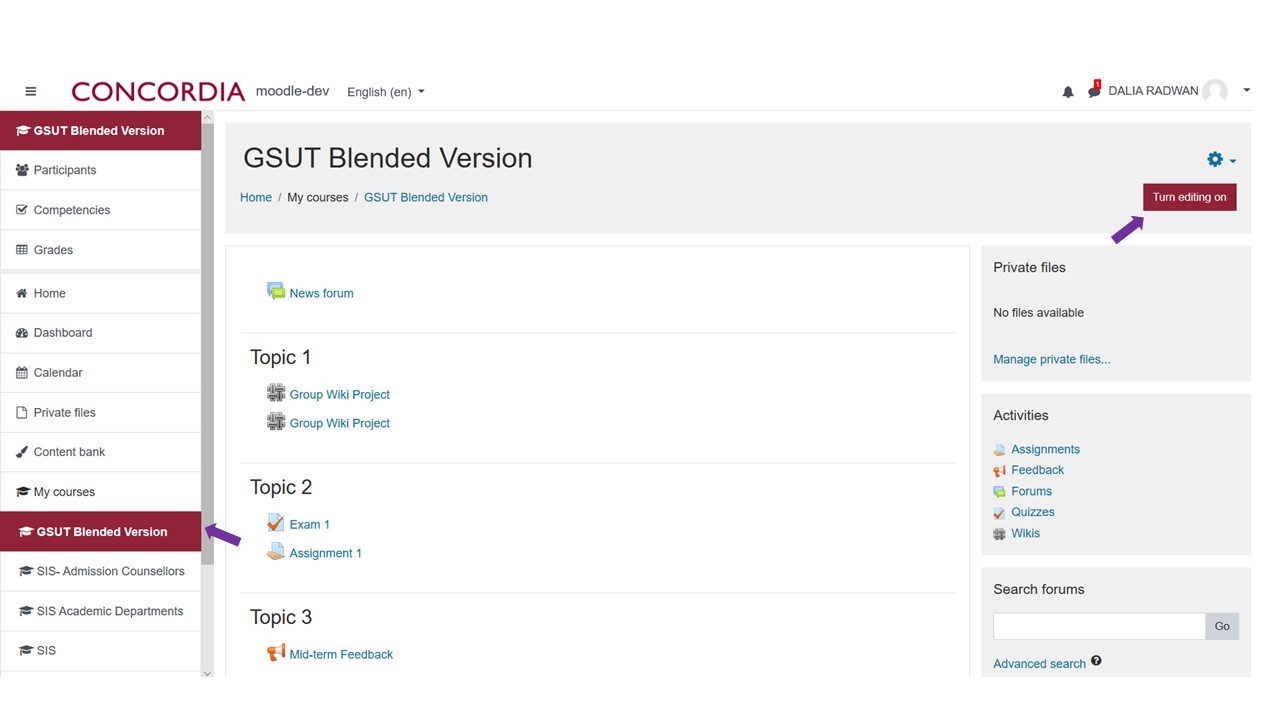
Note: To add or edit any content in Moodle, editing must be turned on.
4. In the first topic section, click Add an activity or resource.
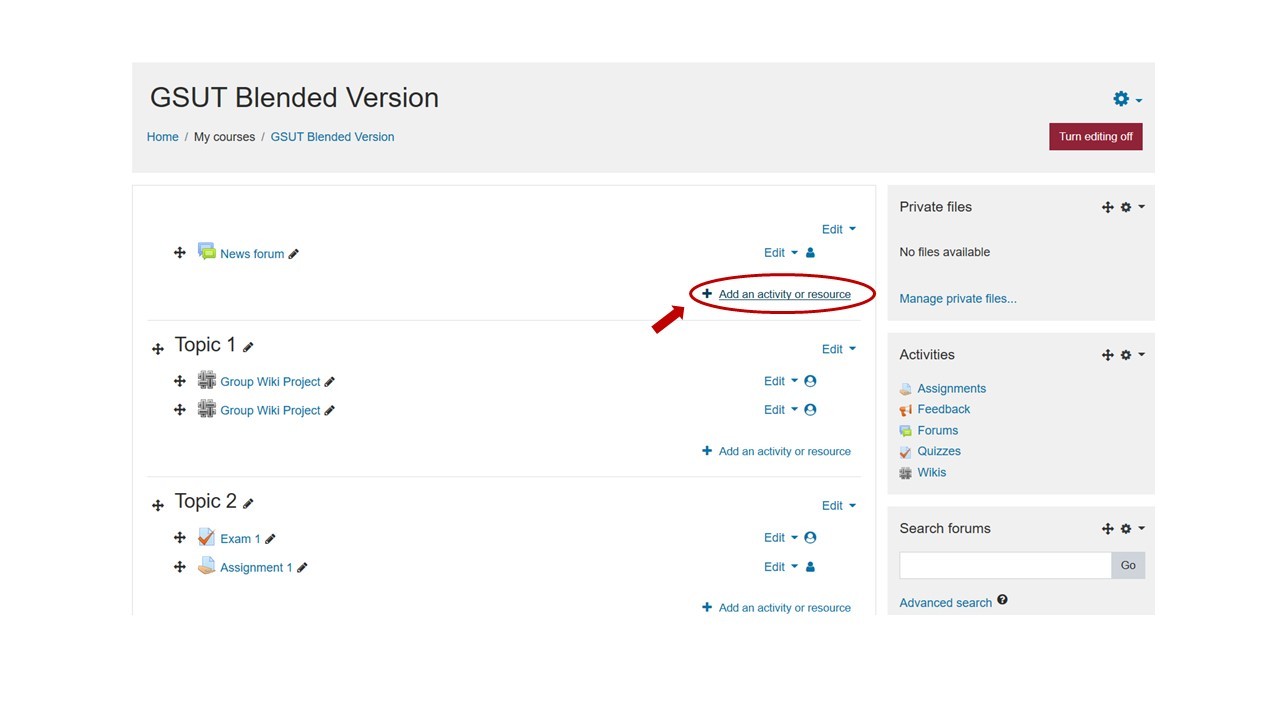
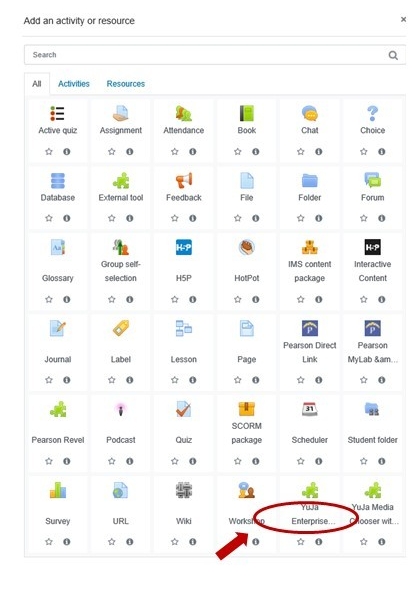
The Activity Chooser is displayed with a list of activities you can add to your Moodle site.
5. Scroll down, and then click YuJa Enterprise Video Platform.
6. Click Add.
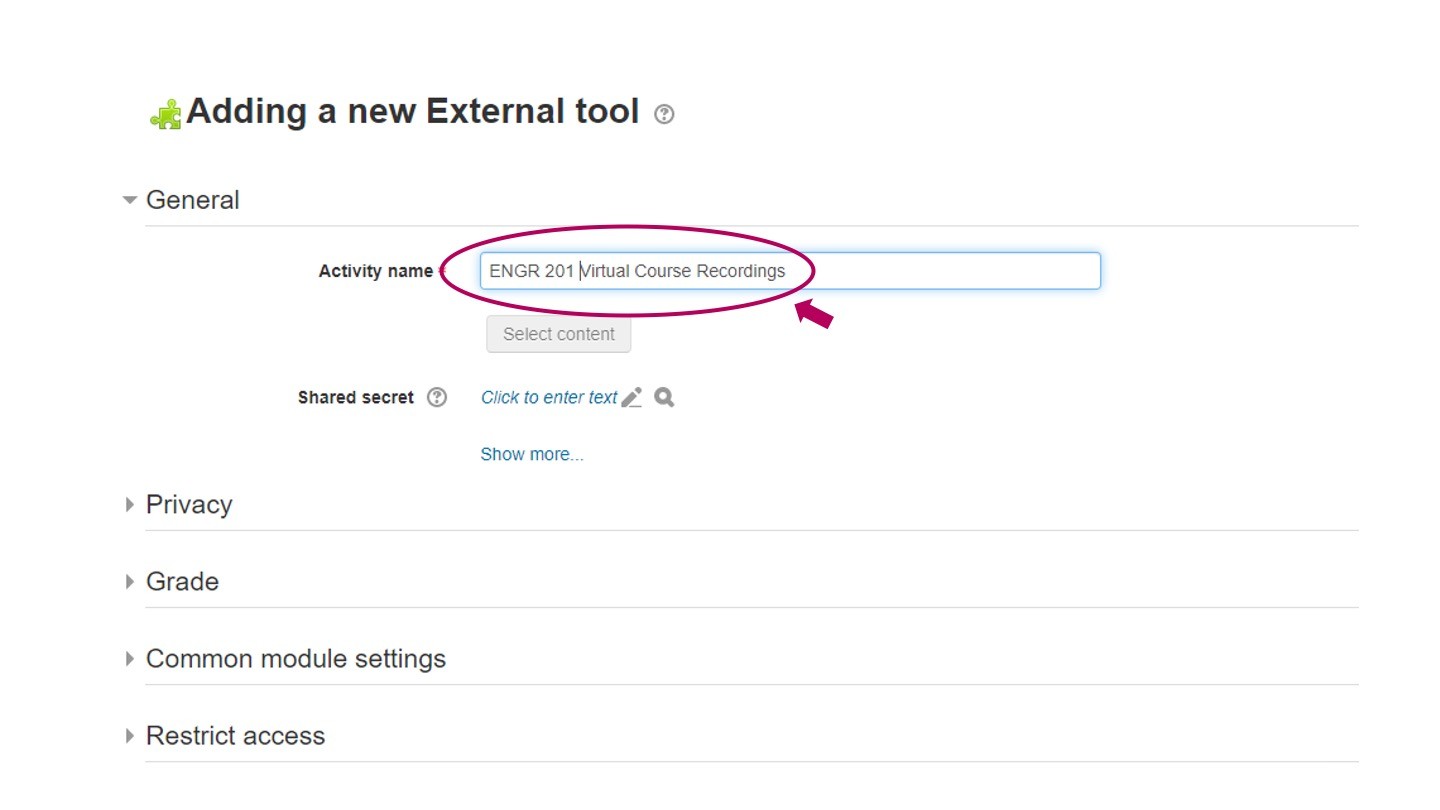
7. In the Activity name box, type [Course code] Virtual Course Recordings.
8. Under Privacy, and then uncheck Accept grades from the tool.
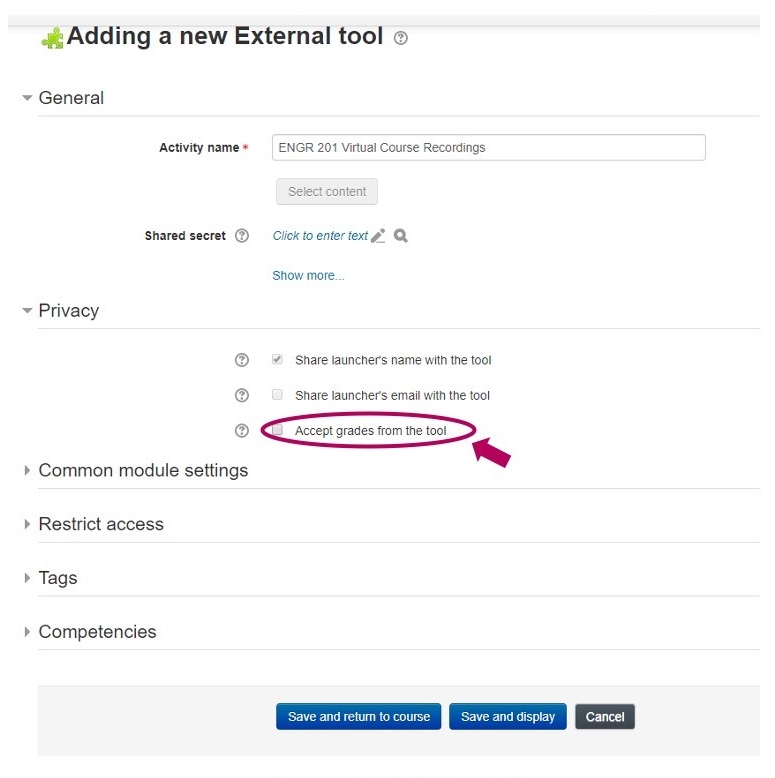
9. Click Save and return to course.
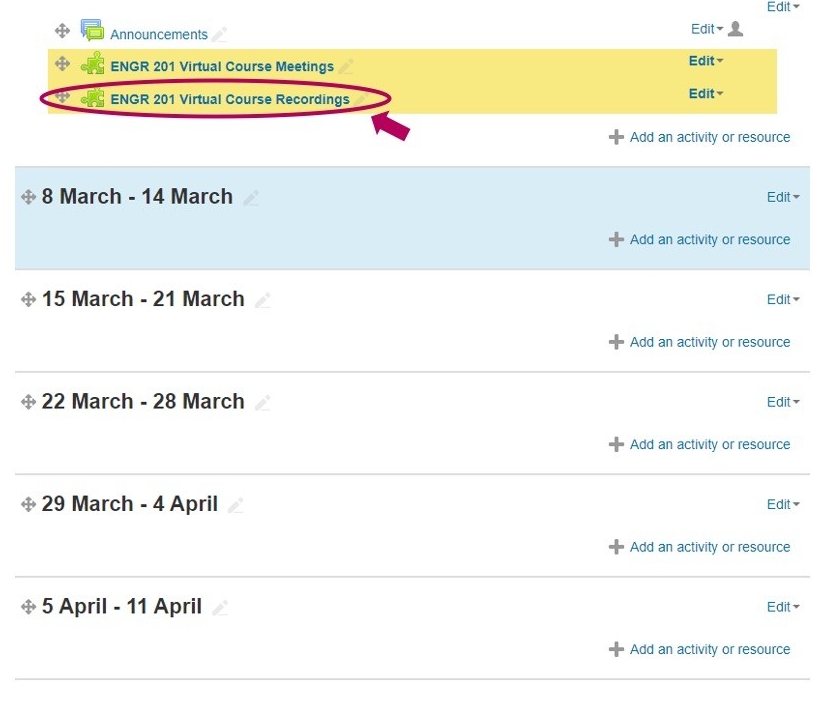
- The [Course code] Virtual Course Recordings link is displayed at the top of your Moodle course page.
- Important note: The activity link is the door to your Personal media library and Shared course channels in YuJa. Add the activity link only once to your course page. By following steps 1-9 to add the activity, you have created a YuJa course channel. You will use this channel later to share your videos.
How to create a folder
Before you start uploading or creating videos, you can organise your personal media library with folders.
To create a folder:
1. On the Moodle course page, click the [Course code] Virtual Course Recordings link.
2. On the My Media action bar, click New Folder.
3. Type a folder name, (for example, ENGR 201 Recordings), and then click Save.
- Your new folder is displayed in your My Media library.
- Note: These folders are located in your personal library, which only you can see.
How to upload a video
After you’ve organised your library, you can start uploading videos.
To upload a video:
1. Click the folder in which you want to add the video.
2. On the My Media action bar, click Upload.
- The Add Media dialog box opens with the video option preselected.
3. Click Browse.
- The File Upload dialog box opens.
4. Find and click the video you want to upload, and then click Open.
5. Click Start Upload.
- The video is displayed as processing in your media library until the upload is finished.
How to publish a video
After you’ve uploaded your video, you can share it with your students by publishing it to the course channel.
Important note: If you wish to share your videos with your students, you must publish them to the YuJa course channel. DO NOT add or embed any links to the YuJa videos directly into the Moodle course. To ensure the privacy of your online lectures, publish your videos to the course channels only.
1. Hover your cursor over the video you want to publish, and then click Publish.
- The Publish to… dialog box is displayed.
2. On the All Channels list, scroll down and click the name of the course channel you want to publish your video to.
- The channel name is displayed under the heading Selected Channels.
3. Click Select.
- A message is displayed confirming that your video has been published.
- Your students can now access the videos through the Moodle course by selecting the [Course Code] Virtual Course Recordings link.
Organizing your YuJa folders
It is possible to organize your YuJa videos in to subfolders to make it easier to locate information. The following video provides instructions for organizing your folders within YuJa. The starting place in this video is the Moodle course where you would like to add folders. be sure add YuJa to your course before you begin to organize your folders.
Additional Resources
Complete Guide - full written instructions on using YuJa as for capturing lectures.
IITS lecture capture services page
Using the Software Capture for Apple Applications (Step-by-step video instructions for creating pre-recorded videos from your Apple desktop or laptop)
Using the Software Capture for PC Applications (Step-by-step video instructions for creating pre-recorded videos from your Windows desktop or laptop)
Using the YuJa video Editor (A step-by-step video from YuJa on how to edit your videos)